With the release of Conan Exiles: Isle of Siptah, we have added support for multiple maps to Conan Exiles. This is an overview of how to utilize that functionality and create additional maps.
Dedicated Server
Picking a Map via ini file: This is the preferred way to select a map for the server to run on. You need to edit Engine.ini located in Conan Exiles Dedicated Server\ConanSandbox\Saved\Config\WindowsServer. Add the following lines to this file:
[/Script/EngineSettings.GameMapsSettings]
ServerDefaultMap=/Game/DLC_EXT/DLC_Siptah/Maps/DLC_Isle_of_Siptah
Replace
/Game/DLC_EXT/DLC_Siptah/Maps/DLC_Isle_of_Siptah
with the filepath to the map you wish to play on. For the Exiled Lands this should be
/Game/Maps/ConanSandbox/ConanSandbox
Picking a map via command line: This is a secondary way to select a map for the server to play on. Add the map path to the command line for launching the game, with no -, before the other command line options. It should look something like this
ConanSandboxServer.exe /Game/DLC_EXT/DLC_Siptah/Maps/DLC_Isle_of_Siptah -log
Save Files: Each map holds its own save file which is loaded when the map is started. The save files have a .db suffix and will be named something different for each map. For Exiled Lands this is Game.db, for Siptah this is DLC_Siptah.db. Each map also has their own backups and upgrade files.
Making a Map
Part of the multimap functionality was exposing everything needed to make a map to mod support, so that modders can make their own maps. As such, making a new map should be completely data driven. The basic flow for this is to either load different data files based on which map you are on as defined by the MapDataTable, or to add map restrictions to specific data tables and take those restrictions into account when reading the table.
The New Map (UWorld)
When planning a new map do not make a map bigger than 8km x 8km . Physics checks stop working outside that limit due to Code optimization.
Unreal documentation on good Landscape practices and settings:
https://docs.unrealengine.com/en-US/Engine/Landscape/TechnicalGuide/index.html
Unreal documentation on World Composition:
https://docs.unrealengine.com/en-US/Engine/LevelStreaming/WorldBrowser/index.html
For Isle of Siptah we used World Creator ( https://www.world-creator.com ) to experiment with landscape shapes and importing this as a heightmap into Unreal. During the course of production all areas have been manually touched, but it served as a useful quick iteration tool and a base to start with.
Undermeshing
Our players are quite skillful in finding new ways to build their bases in areas not intended, usually giving them a huge unfair advantage.
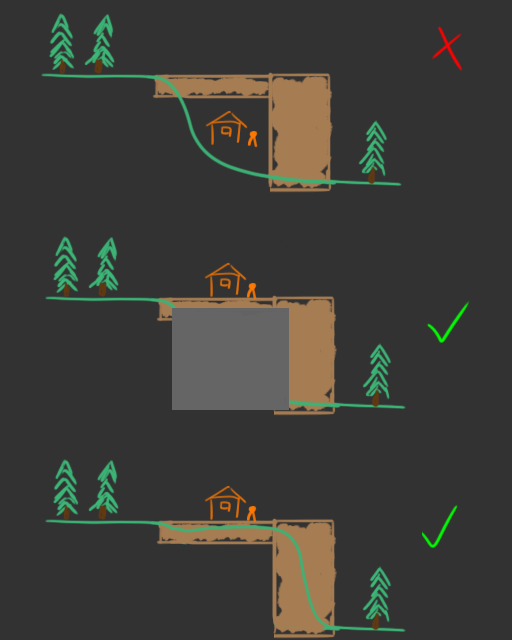
One on the most common exploit is utilizing the gaps between meshes and/or terrain and building their base there.
-
Either put a simple shape in the open space to block players from building there.
-
Or paint the terrain heightmap to better follow the assets placed on it.
Anti undermesh system and special properties volume:
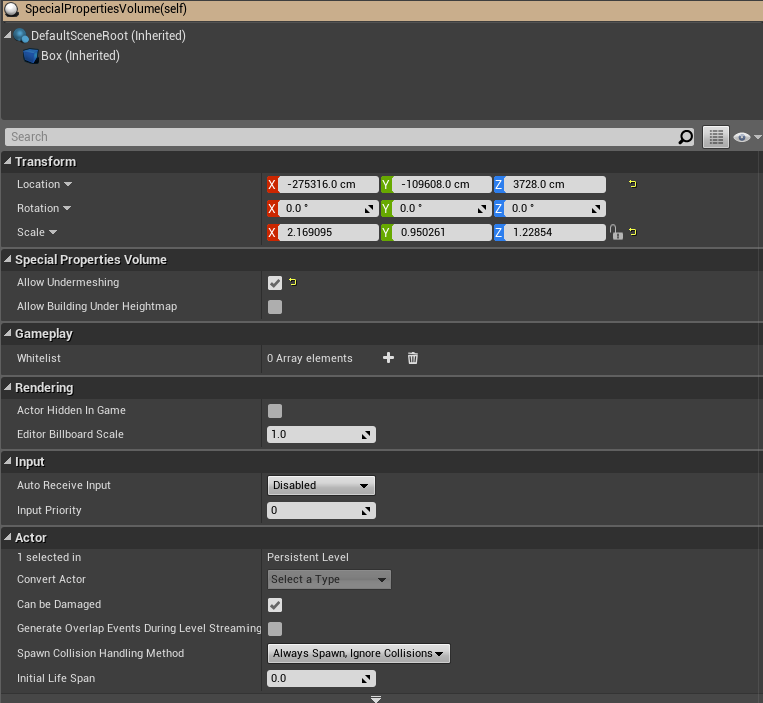
Because of the undermeshing exploits players have been using, an anti undermesh system has been created to stop players from being able to build and access areas they are not intended to. This system will detect if players are underneath or inside terrain or static meshes and will then kill players after a certain amount of time has passed. To prevent players from being killed inside caves, which normally are located under the landscape, a special properties volume is necessary. The special properties volume must cover all parts of the cave and allow undermeshing must be ticked on for the volume to work:
In case you want to make a cave that should also allow building in it, then you should tick the AllowBuildingUnderheightmap box as well.
This must be properly set up in caves even without PVP, as NPCs are using the undermesh detection system to navigate terrain and know where they are not allowed to go
Building blockers
If you want to limit the areas players can build: Create a BP_SplineBuildLimit that covers the playable build area and tag “Allows inside”. Anything outside this will be non-buildable unless you create more splines with “Allows inside”.
Create nobuild areas within this using additional volumes and splines.
For complex shapes use: /Game/Systems/BP_SplineBuildLimit (Often refered to as a BuildingBlockerSpline)
-
It can be inverted, allowing players to only build inside and not outside it. Mainly used on the BuildingBlockerSpline covering the entire build area on the map.
-
Building splines have no height restrictions, it will go infinite up/down.
-
Keep overly complex splines to a minimum.
-
Select and ALT-drag a point will create a new point on a clockwise order in the spline
-
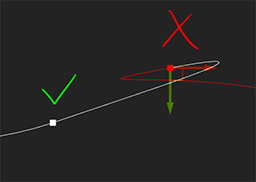
Be wary of twisted rotation of the spline tangents as this will cause random gaps in the functionality.
For simple shapes (Box) use: /Game/Systems/Building/BuildingBlockerVolume
-
Great for caves and anywhere you don’t want the limit to extend infinite up/down
-
Don’t use scale transform top alter size, change the “Box Extent values instead.
Building Blocker volumes and splines need to be in the “Persistent Level” to ensure they are always loaded and active even if you teleport.
Climbing blockers
To stop the player from climbing in an area:
-
Place out the blueprint /Game/Systems/Building/BP_ClimbingBlockerVolume and adjust the size. Make sure the climbing blocker is in the “Persistent Level” to ensure they are always loaded and active even if you teleport.
-
By default all physical materials used have the “Can be climbed = ON”, if you want a specific material to not be climbable (like ice) then you can assign a new physical material with it turned it off.
To allow climbing in an area which is climbing blocked, like ladders in a dungeon, use /Game/Systems/Building/BP_ClimbingOverrideVolume
Foliage
Procedural foliage (Experimental feature in unreal 4.15)
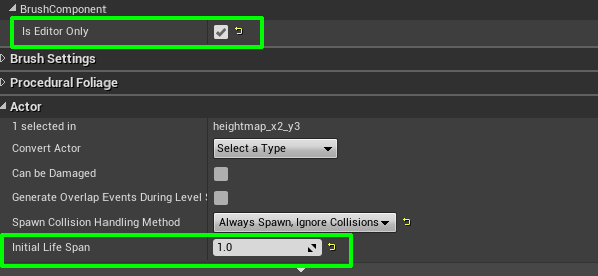
If using Procedural Foliage Volumes, it is very important that you set
Is editor only = ON & Initial Life span = 1
This is to stop the volume existing at runtime, which would block all npc attacks from hitting anything and break admin teleporting.
Water
It is often easier to just copy this from previous made map, but this will explain the components needed.
To be able to drink water:
-
The Mesh must have Actor tag "Water"
-
The mesh must have collision so the interaction raycast have something to “hit”
-
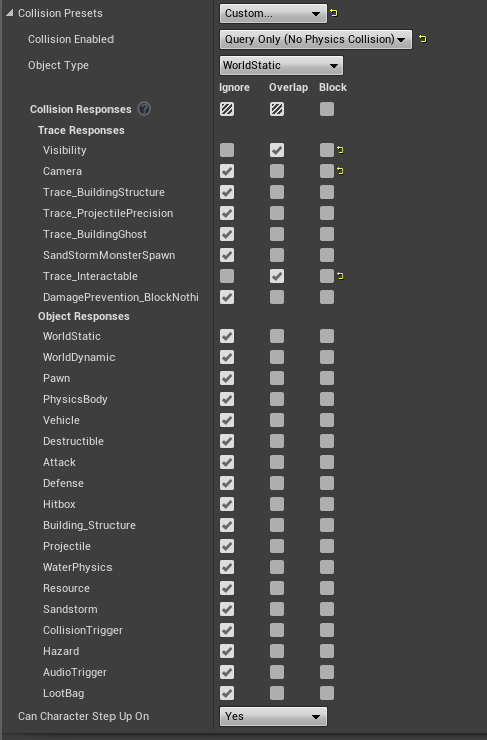
Collision settings:
Ripples:
-
For the water mesh to receive ripple effects, Rendering → "Height output reference water" = ON
-
Example Material with ripples set up : /Game/DLC_EXT/DLC_Siptah/Environment/Materials/MI_river_siptah_refraction_Stillwater.
-
Example texture used in the material to mask out where ripples should be: /Game/DLC/DLC_Siptah/Environment/Landscape/Textures/T_IsleOfSiptah_WaterRipples.
Sound:
-
To give sound when moving in it, the material needs a physical material. (ex. PM_Water_deep)
-
The mesh needs to have collision.
Pathfinding:
To stop monsters from pathfinding into a swimmable area: Create a “Nav Modifier Volume” and give it "Area Class - NavArea_Water”
Swimming:
-
Add a Physics volume with Collision preset set as "WaterPhysicsVolume"
-
In the Physic Volume, Character Movement set Water Volume = On
Post process Volume is needed for underwater camera affect. Create your own or Use an existing one from Exiles/Isle of Siptah.
Good practices:
-
Make rivers with “/Game/ProceduralNaturePack/Spline_BluePrints/master_river_spline”, export it to your preferred 3d software and tweak the uv-mapping to make it go fast/slow in areas.
-
It is prudent to keep rivers flat and use waterfalls to give it elevation. Adjusting all the Volumes (Postprocess, Physics & Nav) to correctly follow a sloping meandering river is a headache you would want to avoid.
Optimization
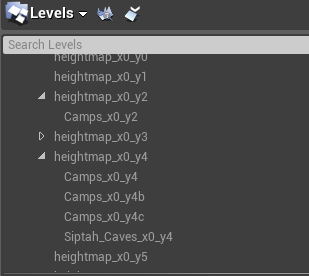
It is good practice to have Camps and Caves in separate levels. This allows you to give more different streaming distances to reduce the amount of content in memory. Having anything underground in a separate level also makes it easier to make a Landscape LOD of only the “top” part.
Instancing:
Large amount of similar assets close together in an area should be instanced together to save drawcalls.
We use the Instance Tool add-on for this work, but be aware that:
-
Any foliage painting on a asset that is turned into a instances mesh will be gone.
-
Vertex painting on the assets will be gone.
-
Assets that have negative scale will have their normals inverted if instanced.
-
Unfortunately any instanced asset will not display its collision in the viewport. (this is purely visual)
-
The Instance tool adds Suffix (HISMA) to the Actor and it keeps the name even if converted back to Static Mesh
-
Modders do not have access to the "Instance Tool" and have to do it the hard way.
-
To help with seeing what is instanced, toggle Show->advanced->Foliage on/off.
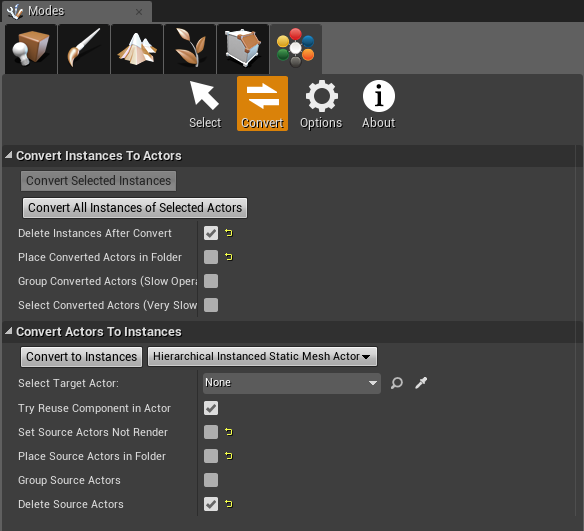
These are good settings to use when converting Actors → Instance / Instance → Actor.
Landscape:
On Exiles & Siptah we use no more than 4 landscape layers per chunk due to a hard lock on PS4 and general performance cost.
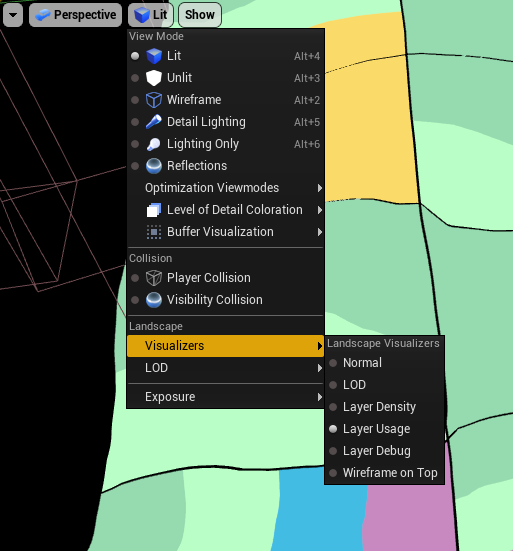
To see the layers used, make sure you are in Landscape Mode → Paint and find the Landscape visualizers
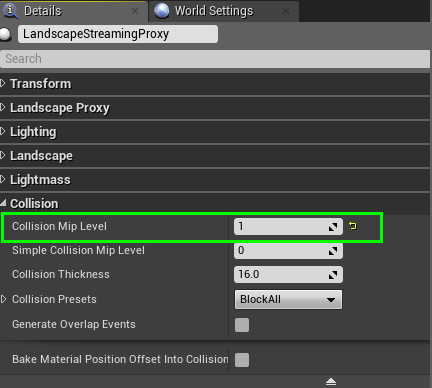
Use LOD 1 collision on landscape to save memory/performance.
The collision will be less accurate since it has less polygons than the visual mesh, in most cases this is not an issue, but there are things to be aware of.
-
The closer the heightmap is to 90 degrees the bigger chance of the player clipping through the landscape.
-
If you cut a hole in the landscape it will be less accurate around the edges.
-
To help visualize how the LOD1 on the landscape looks like. Use the console command “r.ForceLOD 1”
Materials
If making a new asset, do not tweak any material that has a Material master used in a previous DLC/main game. Duplicate the master if need be and make material instances from this. Tweaking materials using existing Master Material files will trigger a granite bake for it, potentially increasing patch size by several Gigabytes.
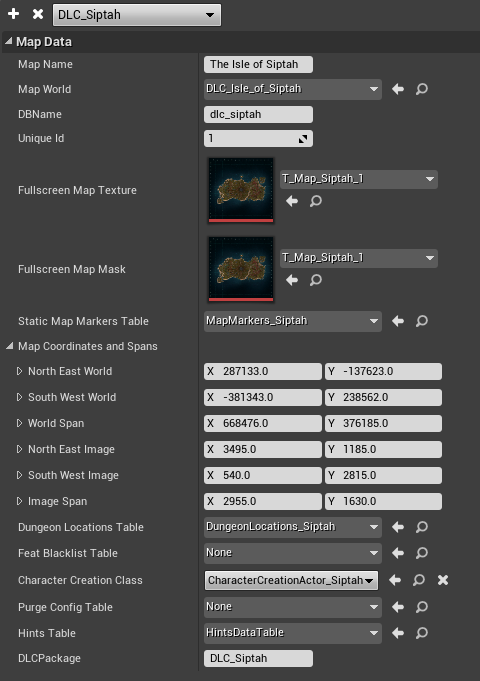
MapDataTable (Content/Maps/AlwaysCook/MapDataTable)
The MapDataTable is the most important part of making a map. It defines many of the resources that your map will pull from in order to differentiate its behavior from other maps. It also provides names for your map in the UI, and for your map’s save files. Many of these are self explanatory, but we will discuss some of these in further detail later on.
-
Map Name - The player facing name of your map. This will show in the UI for map selection
-
Map World - The UWorld asset that defines your map
-
DBName - The name of the database file that your map will use for saving and loading
-
Unique Id - A unique ID for your map
-
Fullscreen Map Texture - The texture to display on the Map UI in game.
-
Fullscreen Map Mask - A black and white mask to apply over the map UI in game. This blocks admin teleporting to out of bounds locations.
-
Static Map Markers Table - A table defining static points of interest for your map
-
Map Coordinates and Spans - These values map texture coordinates on Fullscreen Map Texture to world coordinates in game. Incorrect values here will result in player location markers being off.
-
Dungeon Locations Table - A table that defines a list of dungeon locations for your map. These locations override player location on the map to make the player appear in a logical location on the map, even if they are in a dungeon that is outside the map bounds.
-
Feat Blacklist Table - A table defining a list of feats to not allow for purchase on your map
-
Character Creation Class - The class to be used for character creation in your map.
-
Purge Config Table - A table that defines the configuration of the purge on your map. Set to none to disable the purge.
-
Hints Table - A table that defines which hints will appear during loading screens for your map. Setting this to none will cause no hints to appear on loading screens.
-
DLCPackage - The DLC entitlement required in order to play on this map.
MapDataTable must be loaded and merged early, before the Main menu is loaded.
To load and merge data for maps added by mods:
-
Create a new directory in your mod called “ PreLoad ”
-
Create a new, additional ModController in the “PreLoad” directory
-
Create a new data table based on the MapDataRow in the “PreLoad” directory and add a new row with info about new map
-
Add call to the MergeDataTables in the ModDataTableOperations function in the new ModController in the “PreLoad” directory to merge that new table to the MapDataTable from the base game
Map Coordinates and Spans
These enable player positions in the world to be mapped to positions on the 2d texture provided by the fullscreen map. You can get a map position using Ctrl+Alt+Shift+L in editor. I suggest choosing two locations that are easy to identify on the map and in world. Get the texture coordinates from the map, and go to those locations in world and get the world locations. You may need to adjust with a bit of trial and error.
Dungeon Locations Table
This table defines a mapping between dungeon locations and world locations on the map UI. If a player is within the MapToOverride and the GeneratedBounds then their location will be set to the OverrideLocation. This is how a player inside the Well of Skelos, which is actually far to the northeast of the map, appears to be located inside the volcano on the map.
-
Find the “DungeonLocations” table
-
Add a new entry to this table (or more if there are more levels you want to add as dungeons).
-
Select a level to add in the MapToOverride drop down and add an override location. This could be the x and y world coordinates of the dungeon entrance.
-
Now start the game in the editor as normal. Any map should do.
-
Open the console and type in GenerateLevelBounds. The game can/should freeze at this point, but wait for Generation Complete to show on screen before you continue.
-
When generation is done leave the game running and open the DungeonLocations (you need to close it first if it was already open) and make sure the GeneratedBounds are there for your new dungeon(s).
-
Open the map in game (M) and press one (1) on the keyboard. Check that the dungeon is showing in the correct area on the map.
-
Save and submit the DungeonLocations table.
Purge Config Table
This table sets up how the purge works, which locations are valid for which purges and so forth. This is too long do document here, instead please refer to Purge
Hints Table
This table is a list of hints that each have a random chance of being chosen to show up on a loading screen. Simply add a new entry in the table and write out your hint in the HintDescription text box. This table should use the HintsStructure struct as its base.
Character Creation Class
Character creation can be customized per-map. Each map has its own Character Creation actor that defines how its character creation works. In the properties panel on the character creation actor you can define cinematics, whether the finalize note is attached to the player, and overlay widgets for the cinematics. In the viewport you can supply camera positions for the various phases of character creation, and an animation blueprint to use for animating the character during character creation.
This actor is created when the character creation widget appears, and is placed in the world at the location of an actor with the actor tag “CharacterCreationActor.” Once you place this actor you can build your character creation scene around it to define how you want character creation to look.
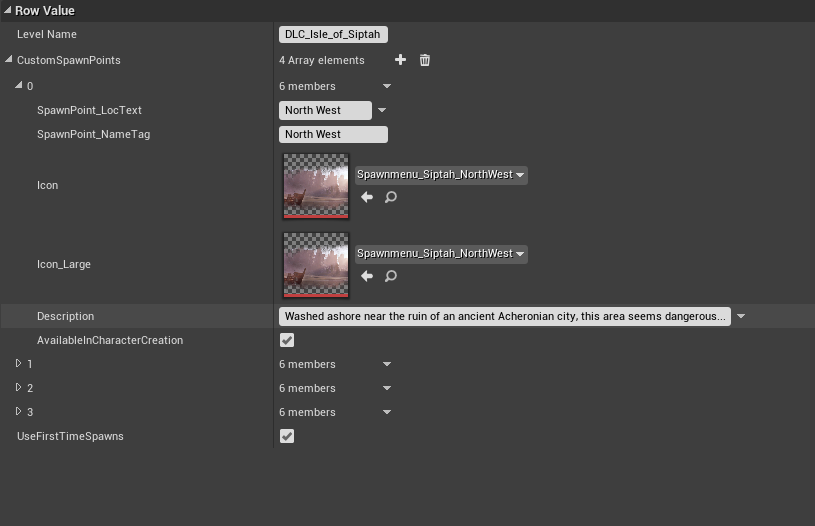
Spawn Locations (MapSpawnLocations data table)
The Isle of Siptah update added the ability for players to select between multiple spawn locations for their randomized spawn location if they do not have a bed or bedroll, and do not have a dynamic spawn point (such as a dungeon).
Create a new row in this table for each map.
-
Level Name - The name of the level asset that these spawn points should be loaded for
-
SpawnPoint_LocText - The player facing name of this spawn point
-
SpawnPoint_NameTag - The tag that will be applied to spawn points in this location. This is how the game knows which random spawn points belong to which location.
-
Icon and Icon_Large - Icons to display in Character Creation or Respawn UIs for this location
-
Description - Description of this location in Character Creation
-
AvailableInCharacterCreation - Whether or not this location is available in character creation
-
UseFirstTimeSpawns - Whether or not the spawn system will utilize player starts set as first time spawns
You must then place BP_ConanPlayerStart or PlayerStart Actors in your level and give them the tags used in SpawnPoint_NameTag in order for players to utilize them.
Character Preview & Dye Window
The character preview (Paperdoll) and Dye Window utilize a special level within the map that you will need to have set up. You can just copy Paperdoll.umap located in Content/Maps/ConanSandbox as it has everything set up to support this and no changes will be needed. The important thing to remember when setting this level up is that it needs to have its Streaming Distance disabled, otherwise it will only work when a player is within a certain range.
To do this, open the Levels window and then open the World Composition from there. Create a new layer by pressing the + icon at the top and name it BlueprintStreamed. Uncheck Stream Distance for this new layer, then add the Paperdoll level to it.
Exiles Journey (DT_ExilesJourney)
This data table defines journey steps. Each journey step has a MapRestriction array. A journey step will be available on all maps provided in this array. If the array is empty, the journey step will be present on all maps.
One important thing to keep in mind with Journey steps is to preserve the number of steps in each chapter. The UI will not automatically adjust its layout so a journey chapter without exactly 10 steps in it will cause UI issues.
Temperature
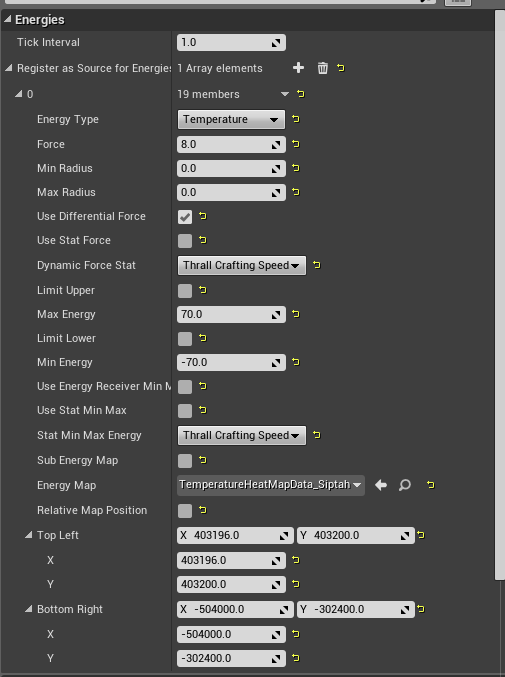
Temperature for a map is provided by a grayscale texture, with pure black being the coldest, and pure white being the hottest temperature. For reference, see T_TemperatureMap. Somewhere in your level you will need to place an actor with an EnergySource component on it. This allows you to set some values for how Temperature is managed in your map.
Here are the values for Siptah for reference
The important values here are the Energy Map, which defines the texture we discussed earlier, and the Top Left, Bottom Right values. An important note here is that Top Left needs to have positive values, and Bottom Right needs to have negative values. This may mean, depending on how your map is laid out in world coordinates, that you may need to rotate your texture 180 degrees so that it is upside down, and allows these values to invert it.
You can check your temperature map in game by pressing ] when the map UI is open. You may need to zoom in and back out once to get the temperature image to scale to the right aspect ratio.
