This page is dedicated to the practice of optimizations and how to actually go about doing it. On this page, we will cover as many aspects of optimization as we can and detail the process as much as we can.
Practicing
A note about practicing optimization… There is a dataset called
/root/Live/Stable/Test/Development/OptimizationTutorials/
Where the following levels have been, on purpose, screwed with in order to make them less optimized.
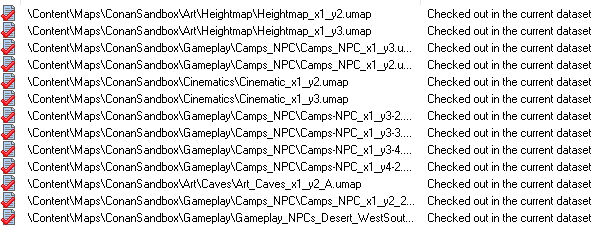
This has been set up as a playground where you can test and try out some optimizations. Check out these assets locally by using the Soft-Check out option in the Data-Explorer.
Decide on what actually needs to be optimized
It’s easy to look at a region with a problem (low FPS or memory) and start loading the camp or heightmap level and jump into instancing and moving meshes from one heightmap to another.
Doing this is a mistake because the region with the problem isn’t necessarily the region that has the problem. Adjoining heightmaps or camps within streaming distance other than the region may be the culprits.
Identifying where the problem lies can most easily be done by doing the following:
-
Load the heightmap where the region is loaded
-
Load all the gameplay levels that intersect with the heightmap and ALL adjoining heightmap
For each of the levels loaded, we can now start looking into the world outliner to identify problems with the heightmap. This can take quite some time in order to do it correctly and meticulously enough to actually solve the problem, so in order to do this properly, we’ll follow a few general guidelines.
Important Note: Study the situation closely BEFORE doing optimizations. Read the steps below before actually jumping in and doing optimization so that you know ahead of time what to do and why.
Level-bounds and Streaming Distances
Level-bounds and Streaming distances are tightly linked and it’s a good idea to do these two steps at the same time. You should also re-check these AFTER you have done the optimizations to make sure that these (in particular the level-bounds) stays intact.
Check Level-bounds
The first step (and easiest) should be to check the level-bounds in the level. While doing this step, having the world composition window open is mandatory so you can get visual feedback for changes done.
Note : Level-bounds for heightmap levels should never be set to “auto-adjust”
-
If the level-bounds has been set to NOT have “Auto-adjust”, tick the checkbox and see if the level-bound is reduced in the World Outliner.
-
If the level-bound is not reduced, it may be that either the level-bound is fine but it might also be that something called “NPCTerritorySpawner” has been set up to be too large (more about this below)
-
If the level-bounds increase in size (especially if the change is significant), it might be that there are actors outside the level-bounds or Unreal thinks that there are.
-
Common problem: Territory Managers are huge
This is fairly straight-forward to fix - in the level, search for “NPCTerritorySpawner” and inspect the Scale value. If this is a huge number (higher than 100x100x1), this might require adjustments. Typically, a territoryspawner should not have to be huge - generally speaking, it should cover the camp/wildlife/whatever it spawns, but no more.

-
For Camplevels, I recommend reducing these numbers to 25x25x1 and moving the NPCTerritorySpawner to the middle of the camp.
-
For Wildlife levels where the wildlife is clustered, I recommend reducing these to 100x100x1 and moving the spawner to the center of the wildlife level.
-
For Wildlife levels where the wildlife is scattered, I recommend making this as big as it needs to be to cover the spawns - typically 500x500x1 should be enough.
Common problem: I made the territoryspawner small and now nothing spawns
Territoryspawners do deactivate at a certain range called Network Relevancy range. This is why I mention in the above example for Wildlife levels that it’s a good idea to make it cover the spawns. For camp-levels this should ideally not be a problem, because camps shouldn’t be as large as to require this - however, it might be the case that they are, in which case, you should simply increase the size for the TerritorySpawner until things start spawning correctly.
Common problem: Auto-Adjust causes the level-bounds to expand
A typical example of when this happens is when there are HISMA actors that have been spawned at 0,0,0 but it may also be the case for certain blueprints placed in the level, empty HISMA actors or actors that are simply outside the level when they shouldn’t be.
Identify the actors that cause this problem
-
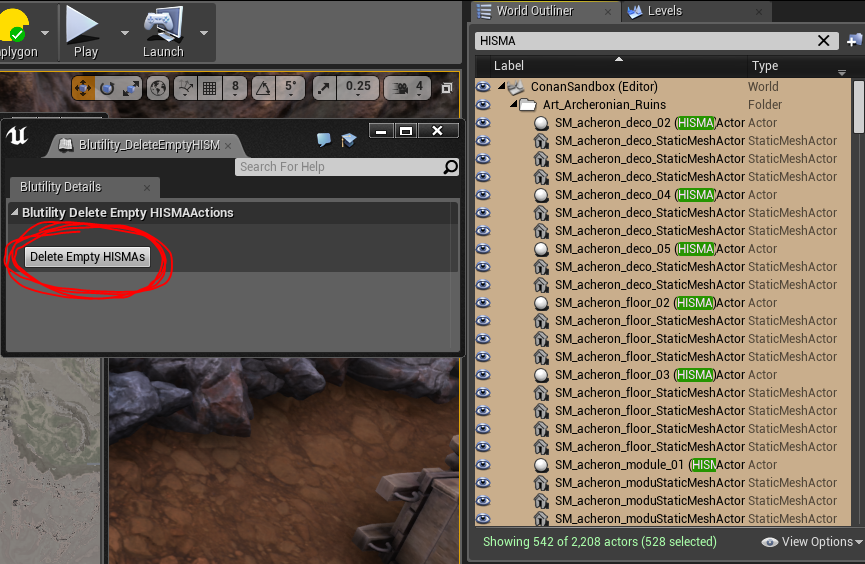
Search for HISMA in the World Outliner, mark all the entries in the list and run the Blutility tool called “Blutility_DeleteEmptyHISMA”
-
Mark actors in the level, CTRL-X them and see if the level-bounds adjust. If the bounds does not adjust itself, UNDO the cut function (do NOT paste the actors back in! See the Warning below) and redo this procedure until you have found the offending actors. Once the actors have been found, you can temporarily remove them, unclick “Auto-adjust” in the level-bounds and then paste the actors back in.
-
If the actor is a static mesh or skeletal mesh that is very far away from the level-bounds, it’s almost certain that this mesh can simply be deleted, since it will never have been rendered in the game. However - you will need to evaluate if this asset should then be placed into a level where it seems to belong instead.
Warning! If the offending actors are blueprints, odds are that these are hooked up to other blueprints. IF the offending actor is a blueprint, you should NOT CTRL-X and CTRL-V these assets. That will break the link. Instead - follow this procedure :
-
CTRL-X the blueprints
-
Turn off auto-adjust
-
Copy the Location and scale for the level-bounds into notepad
-
Use the “Undo” function until the actors are back in the level
-
Turn off auto-adjust for the levelbounds
-
Copy the location and scale from notepad into the levelbounds
Common problem: The camp level is huge
If the camp-level is very big, it might be necessary to split it up into multiple levels. When splitting up a camp-level, the following questions should be taken into consideration:
-
Does the camp consist of specific, separate smaller camps?
-
If so, making individual camp-levels for each of these camps would be a good approach
-
-
Does the camp consist of separate sections that can be split up by themselves?
-
If so, making individual camp-levels for each of these sections would be a good approach
-
-
Does the camp have huge wall sections or other occluders that prevents players outside the walls looking into the camp itself?
-
If so, making a separate camplevel for these occluders specifically is a great approach. In addition, the camp might require a section split, but doing this will make the work a lot easier
-
Make the camp-level that contains the walls/occluders have a higher streaming distance and the contents of the camp/sections have a much smaller streaming distance. See “Check Streaming Distance” below
-
Check Streaming Distance
Streaming distance is measured from the edge of a levels level-bounds to the player. If the player is within that range, the level loads. If the Streaming distance is very large, it means that the level, despite perhaps having a very small level-bounds, has a very long streaming distance when it doesn’t need to have it.
Hovering over the level in the World Composition will give you the Streaming Distance of a level, like so:
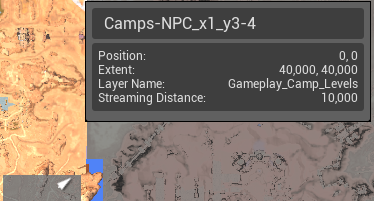
Most commonly, you will see that camp-levels have been set to 10 000. This is what we have decided in the past is the optimal streaming distance for gameplay levels. Heightmap levels typically have been set to a higher value (50 000 or 100 000 for Siptah) to make sure that players do not see a sharp ‘end of world’ cut.
To find the correct streaming distance for a level, you should check the following:
-
Is the camp-level split up into sub-levels?
-
If so, is there one of these camplevels that contain walls/occluders? If this is the case, this level should have a higher streaming distance than the camp inside it. This is the ideal situation and I recommend setting up the smaller levels inside the walls to 5 000 streaming range, and the outer wall levels to a higher band, such as 10 000 or 15 000 or even 25 000 if the walls should be seen from very far away.
-
If not, can it be? If so, split the level up.
-
If it cannot be split up, which is a relatively common problem, optimization likely has very little to do with streaming distance, and instead you will need to look into other venues of optimization.
-
-
Common problem: The camp pops into view when approaching it
This should be possible to solve by following the above solution where the camp is split up into an outer hull and inner camp levels and then setting the streaming distances for the hull level to be higher. In the case where a hull-level cannot be made, this camp will need to have the streaming distance increased. However - this will cause a memory hog, and the level should be looked at for other, strong optimization passes instead.
Common problem: Lights do not show up from far away
A good solution to this is to move lights that are not part of blueprints into the heightmap level. If there are no such lights, the solution should be to split out these lights specifically to a level with a higher streaming distance. Something to keep in mind here is that moving camp-assets (BP_CA_xxxx actors) to a separate level also means that this new level should have a “CampOwner” and “NPCTerritorySpawner” blueprints in it. Ask a designer for these things or use the CampBlutility to hook them up if you know how.
Common problem: There isn’t a streaming distance preset that makes sense for this level
Create a new streaming distance in the World Composition view and assign the level to this new streaming distance.
Check for Empty HISMA actors
This is a step that should be done no matter what. It should be done before optimizing the level, and after optimizations have been done. This is especially crucial if you have been moving assets between levels after de-instancing them.
-
Search for HISMA in the World Outliner, mark all the entries in the list and run the Blutility tool called “Blutility_DeleteEmptyHISMA”
Moving assets between camp and heightmap levels
Assets that are placed in a heightmap level are loaded into memory from far away, given that the streaming distance of such levels are much higher than the streaming distance of gameplay levels.
Here are the guidelines for what heightmap levels should contain
-
Cliffs and visual occluders such as acheronian ruin walls and other separators that affects the players visibility range.
-
Fogplanes and regional particles that can be seen from very far away
-
Water (and related water volumes, navmesh modifiers, etc) that does not span multiple heightmaps
-
Heightmap+Foliage (and foliage blocker volumes)
-
Blocker/Climb/Water/Audio volumes
Anything else should be inside camp-levels or at least separate levels from the heightmap.
“Hull-levels” - a definition
In the text going forward, I will be referring to a concept I call “Hull-levels”. I define a Hull-level as a level that contains a visual barrier/occluder between the player and a camp. An example of this would be a large wall surrounding an encampment, or a series of combined, smaller assets that provide a visual clutter that also works as a camp-deliniation. Hull-levels should contain a minimum amount of assets but enough of them to provide a visual barrier for the player to prevent rendering most/all of the inside of a camp.
Checking assets that are in the heightmap and camp-levels
Assets that do not match the list above should be considered for moving to a camp level, or at the very least, a level separated from the heightmap. It pays to understand why this is done:
A single asset placed in the heightmap will be loaded while in the heightmap as well as while the heightmap is streamed to a player. This means that the more unique assets we have in the heightmap, the more memory will be consumed by these assets.
Conversely, if you have a single asset in the heightmap, you may as well have all the other assets of the same type in the heightmap as well. This is very much an all-or-nothing system, and this is also the reason why I recommend splitting up camp-levels into Hull levels and Inner levels instead of putting the assets into the heightmap. That way, there’s no confusion about what goes where.
Important note: There are a variety of other issues that might appear, detailed in the list below. Because some of these issues are not always easy to detect, I recommend going through each and every asset placed in the world to see if they match these issues and deal with them individually.
-
Actor is not visible because it’s set to be invisible
-
Sometimes, actors are set to be invisible (or hidden in game) to make use of collision. Assets like this should use cubes or other low-poly meshes. If the mesh is not a cube, cylinder or other primitive, this asset should be replaced with such
-
-
Actor is not visible because it’s inside a mountain, under the ground or otherwise poorly placed
-
This actor should be deleted
-
-
Actor is a skeletal mesh
-
This actor should ideally be placed in the camp-levels and also make sure that it truly is a required asset.
-
-
Actor is a HISMA that is badly instanced
-
This actor should be de-instanced and properly re-instanced
-
-
Actor is a DM (Destructible mesh)
-
This actor should be replaced with the SM (Static Mesh) version of itself
-
-
Actor is a blueprint
-
A common mistake is to split levels and move some (but not all) blueprints from one level to another. This should not be the case. If an asset is a Loot-chest, spawn-point, waypoint, campowner, territoryspawner or a BP_CA_xxxx asset it should NOT be in a heightmap level. In addition, you should check the level if these have been correctly hooked up to a campowner/territoryspawner because without these hookups, the actor will not spawn (or in a best-case scenario, only spawn once)
-
BP_CA_xxxx assets
When the Exiled Lands was created, a number of blueprint actors that contain multiple meshes, particles, sounds and the like were created. Some of these are very useful, whereas others should not be used anymore (at all).
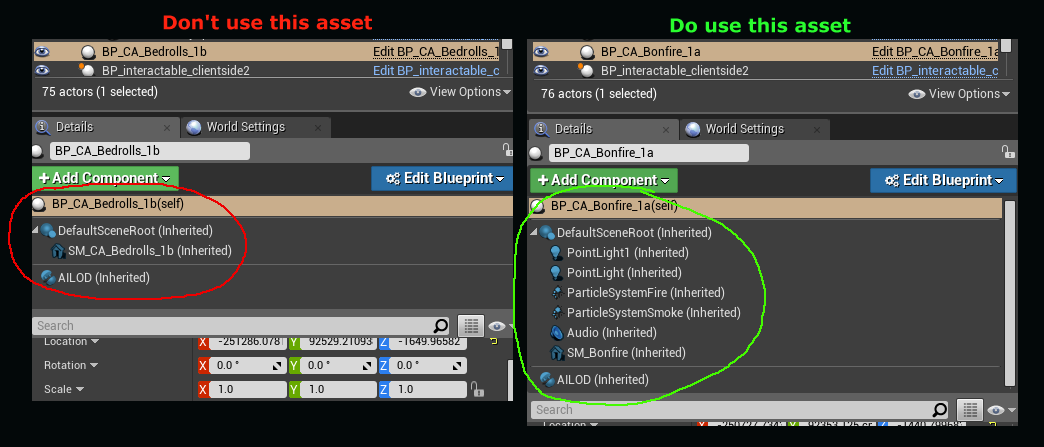
The only BP_CA assets we should use are the assets that have sounds, animations, functionality and/or particles attached to them. Decorative blueprints should NOT be used - they can’t be instanced, and they tick when they don’t need to.
In short - inspect the BP_CA Assets in the Details Pane and if they only consist of static meshes and skeletal meshes, these should be replaced with their static mesh and skeletal mesh counterparts.
-
You can convert a blueprint into another asset by simply right-clicking the blueprint in the viewport and select “Replace selected actor with…”
-
Once the conversion has been done, these should be renamed to the name of the StaticMesh/SkeletalMesh
Common problem: There are non-heightmap assets in the heightmap level but no camp-level for them
These assets should likely be moved to their own levels. If the area is a unique location, such as a city, a set of ruins or otherwise contain large occluders, these are perfect assets to move to such levels. Check for these things:
-
Can players climb tall cliffs nearby and look into the level? If this is the case, the assets should stay in the heightmap level but only if it feels strange that it cannot be seen.
-
Is this asset providing a visual occluder to a camp? If so, this asset should either be part of the heightmap level or split into a level that acts like a hull around a camp to allow the camplevel to have a smaller streaming distance.
-
Is the asset very small? If so, it’s very likely that the asset should be in the camplevel instead of the heightmap level.
-
Is the asset very heavy in terms of memory (for whatever reason such as loading a lot of textures)? If so, the asset should either be art-optimized and/or moved to the camp-level or removed completely . Typical assets that have a very high memory footprint are:
-
Weapons
-
Armors
-
Skeletal meshes for monsters
-
Crafting Stations
-
Marketplace assets
-
Common problem: There are non-heightmap assets in the heightmap level that provide visual occluders
When it comes to large pieces that are used for this purpose such as the acheronian walls that surround the Unnamed City in the Exiled Lands, these assets can stay in the heightmap.
Common problem: There are assets of the same kind in both camp-levels and heightmap levels
This is very common and ultimately, you will need to make a judgement call on which assets need to exist where. Ideally, the solution is to have all these assets in the same level, be it the heightmap or camp level.
-
If the assets are small, they should not be in the heightmap level and should be moved
-
On the other hand, if the asset is big, the asset should be moved from the camp-levels and into the heightmap level or a separate level that has a high streaming distance.
-
If the assets are occluders, they should be either in the heightmap level OR in a separate level that has a high streaming distance. Ideally, a separate level works best here.
Common problem: The asset is a unique asset
Assets such as this require a judgement call. If the asset can be seen from very far away (For example, the Tower of Siptah) then it’s probably best to split it into a specific level rather than linking it to the heightmap. If the asset is very small, it should definitely be in a camp-level. Other factors like occlusion and memory efficiency should also be considered.
Common problem: The actor is small or medium sized but placed in such a way that it can be seen from far away
This happens a lot with crates, flags, banners, spikes and other assets that define the outer edge of a camp. These assets should be moved to a Hull-level if at all possible but no matter what, should not be part of the heightmap.
Instancing meshes
Instancing meshes is important for GPU performance (framerate). Instancing can very easily be misused, and badly done instancing will instead increase GPU overhead instead of reducing it.
In the Modes/ panel, we have a button with colored circles in it. This is the instancing tool we use. I recommend setting it up like in the image below.
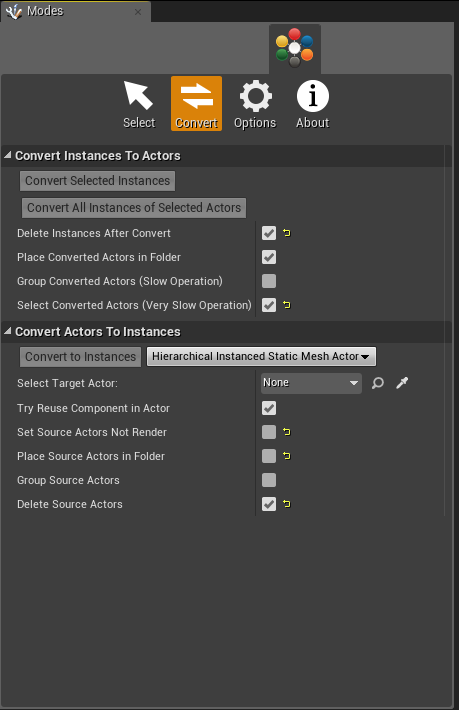
It pays to know how to use this tool - and not everything should be instanced:
-
Certain transparent assets
-
If you get a message when loading a level saying that meshes have been found where material properties are not set up to allow instancing, you need to de-instance these meshes
-
-
Certain cliffs
-
Instancing cliff assets runs the risk of removing foliage on top of them. In addition, cliff materials will sometimes become stretched or checkerboarded. If you need to instance cliffs, you should double-check with a lead artist to see if it is necessary and if so, what changes needs to be done to materials to allow them to be properly instanced.
-
-
Skeletal Meshes/blueprints
-
These assets can’t be instanced at all
-
-
Meshes with negative scaling
-
Instancing meshes with negative scaling leads to abnormally aligned vertexes and will break the asset.
-
-
Meshes that are single meshes already
-
There is no point in instancing what does not need to be instanced. In fact, doing so makes it harder to edit the asset and while it causes no damage, is simply unnecessary and can be very confusing.
-
-
Meshes that exist in different levels
-
This is a big no-no. When instancing, you should only ever have ONE level visible, which is the one that you are currently working on. Otherwise, what happens is that all the instanced meshes are moved to a single level.
-
-
Meshes that are too far away from each other
-
This is the most common mistake when instancing and we will cover this in detail below.
-
The TL;DR rule of instancing is: “If assets share the same mesh and textures and can be seen by the player at the same time at a low/medium distance from them, they should be instanced together”
There is a caveat to that statement, however. If a player can see the walls of a huge fortress from very far away, the player can technically see all the walls, but the more common case is that the player will be closer to the walls. You should never instance things based on awkward visual angles. Think about how a player plays, don’t try to angle the camera in a strange way just to include other objects of the same type.
Deciding on what to instance
It pays to look at all levels that occupy the same space first to decide on what to instance.
Moving things into folders based on location is highly recommended , as the risk of missing assets or overinstancing is very high.
I recommend making the folder, move items into it, then making the folder invisible, and repeating the process until every single asset is contained within a folder. It sounds like it would take a lot of time but once you start, you’ll find it’s quite quick
The key thing to remember is that every time you look at a single mesh that has been instanced, the engine renders all other meshes that it has been instanced with. Examples of good and bad instancing can be found here: Map Design Best Practices
Common problem: Every single mesh of one type has been instanced to a single instance
The solution to this problem is quite painful. In essence, what it means is that whomever did the instancing, did in fact not do instancing. You will need to de-instance these assets, and then do instancing properly by following the guidelines above.
Common problem: A single asset has been turned into an instance
De-instance the asset and delete the HISMA actor.
Common problem: A very long row of wall-pieces or floors or other assets have been instanced together
This typically happens when assuming that instancing everything together at the same time is always a good idea. De-instance the meshes and split them up, and re-instance them.
Common problem: A group of instanced meshes contain way too many instances
Instancing is a great help when it comes to kit-bashing objects together - but there are limits to this. A single kit-bashed asset should not have more than 5-10 instances in it. If this is the case, consider asking an artist for a proper mesh version of the instanced mesh instead. Should this not be possible, consider not using the kit-bashed construction, or reduce the complexity of it.
Lights, Shadows and Particles
Lights and and particles do not contribute much to memory overhead, but framerate can suffer if there are too many of them placed in the same location.
Lights and Shadows
Unless you absolutely have to, there’s no reason to have lights cast shadows. It’s prettier but contributes to GPU overhead, especially if dynamic shadows are on.
-
Consider at the very least dropping the dynamic shadows from lights placed in the world.
-
If an object is very close to the heightmap, such as ruin floor pieces, another way of optimizing these assets is to deactivate shadows from that object. This optimization is really not necessary unless there are severe GPU issues in the area.
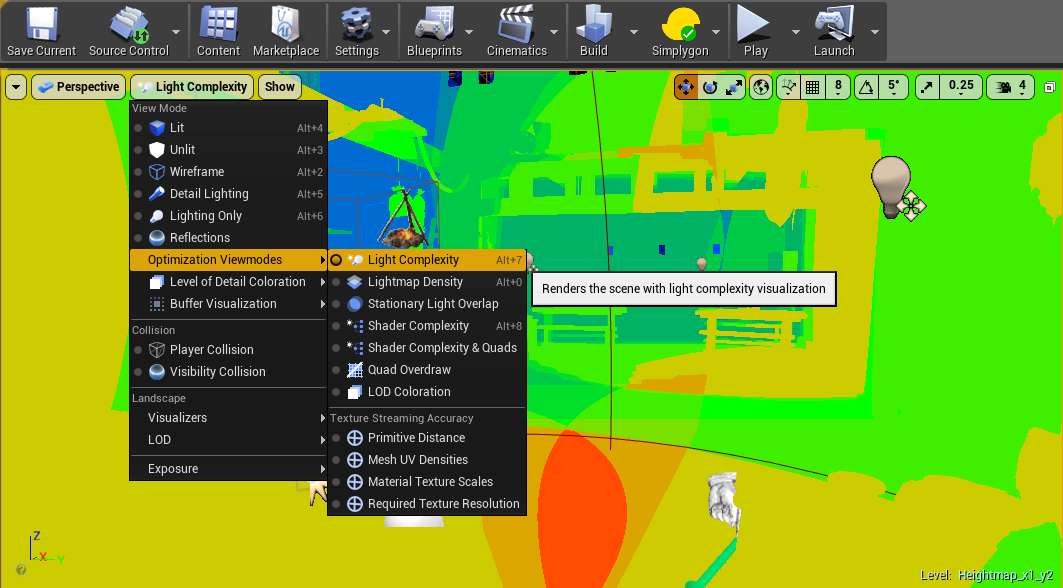
A good tool to see if your lights are too complex is to activate “Light Complexity” view mode in the editor.
Particles
Particles that are very small can have their render distance lowered. A typical example of this would be candle-flames that do not need to be rendered at a distance of 10 000 (default) - instead, consider dropping these down to 1000.
Mesh Asset Optimization
For meshes, there are a number of optimizations to consider. For Conan Exiles, we use Granite, which is a render pipeline that determines what textures to load based on what is on the screen.
Granite
Granite contains two distinct texture streaming systems: a classic mipmap streaming system that loads into convention texture resources, and a virtual texturing system that loads texture tiles into a tile cache.
The remaining assets could have a lower resolution, be visible most of the time or sampled many times. For these assets, like foliage or particles, it’s more efficient to use a classic mipmap streaming system.
- Graphine Software
Granite allows us to use high-resolution textures on assets - that doesn’t mean we should. Granite isn’t a solution that works by magic; it increases GPU overhead by increasing material complexity, and higher source resolution textures increases file-size of patches. In addition to this, it makes it impossible for modders to mod our assets and has been proven unreliable to build. Granite is a fine solution, but it’s not a solution that should be applied to everything.
When making assets, please do keep this in mind.