About this guide
In this guide, we will be taking a look at the pet system and how to create a new type of pet. Note that Human Thralls are different in many ways and the approach to making a thrall is not the same.
And so, this guide will talk about the best-practice of making a pet, some of the information in this guide will also be pertient to making a new type of animal, since pets are essentially animals with additional functionality on top.
Note: We will not be going over certain specific aspects of creating a new pet, for example how to create new attacks from scratch. It is out of scope for the guide and would bloat it something fierce.
Step 1 - Setting up the pet blueprint
Starting with the pet blueprint is considered best practice, since all the data required for pets are dependant on this.
A good idea is to make a copy of an existing monster blueprint and edit it.
For this an example, we will be taking the Crocodile pet, which you can find here:
/Game/Characters/NPCs/Crocodile/Blueprints/BP_NPC_Wildlife_Crocodile_pet", and using it as a basis to make a new type of pet (could be a Komodo, as an example).
Important note: In this guide, we’re assuming that you need a new blueprint - you can use an existing wildlife blueprint as a pet as well, unless you have custom hitpoints, damage, weapons or skin setups.
Setting up the base for a pet
If you have copied an already existing pet blueprint, you don't need to do this, but it may be worth knowing about it. If you filter the blueprint for "pet", you will see something like the following

Pet Name is something that is by default gotten from the Spawn Table and does not need to be set here, as it will be overwritten anyways.
The hunger messages should be self-explanatory, but... finally, the "Is Pet" flag is crucial if you did not use an existing pet blueprint as a source for yours.
Example: Copying the Cobra blueprint and making a new Cobra-pet would require you to check the "Is Pet" box in your new blueprint.
Baby animals
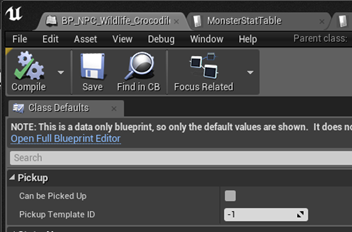
If you want players to be able to interact with your pet in order to pick it up into their inventory as an item, you will need to find the section in the blueprint (image to the right)
Check the "Can be Picked Up" flag, and put the Item Template ID you want the players to gain into the "Pickup Template ID" entry in the blueprint.
Setting up attacks
You may want to set up new attacks for your pet - if you don't, the pet will use the same attack-stats as the wildlife version, which may cause damage, armor penetration and so forth to be very low or very high.
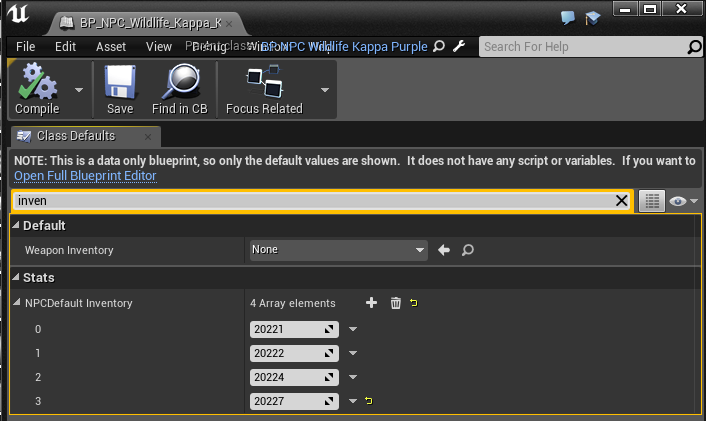
Setting up a new attack requires you to edit the Item-Table to create the new entries and then putting them into the inventory of the pet.
As you can see on the right, the "NPCDefault Inventory" contains all the attacks of a monster - these Template IDs can be found in the ItemTable as separate entries.
Another reason you may want to look at this is to remove specific entries from the wildlife (perhaps you don't want certain attacks to trigger, or maybe you don't like that your pet does a taunt).
Setting up the Physical Material
The Physical Material of the pet determines two major things:
• The loot it drops when it dies, determined by the LootTable_Resource
• The stats like health, XP, etc that the pet gains from the MonsterStatTable
You can find the Physical Material in the blueprint of your pet if you use the details tab and search for "phys mat"
LootTable_Resource Table
If you don't have an entry in this table, it will not be possible to harvest the dead body of the pet after death - this table allows you to set up the following:
isRock - This is only used for rocks placed in the world. Skip this for pets.
isTree - This is only used for trees placed in the world. Skip this for pets.
shouldDropAll - If the pet should drop all the resources listed in the individual entries Generic, Special, and Limited Resource
MinHitPoints - The minimum amount of chops it should to completely harvest the corpse
MaxHitPoints - The maximum amount of chops it should to completely harvest the corpse
RespawnTime - This is only used for resources placed in the world. Skip this for pets.
MaxPickupDropValue - No longer used
NodeTier - Only used for resources placed in the world. Skip this for pets.
DropOneLimitedResource - If you want your pet to be guaranteed to drop a single Limited Resource, check this box (if you have a corpse assigned to your pet, you will want to check this)
ResourceTemplates - If you want a base template to use for your pet loot, you may link this to an existing one.
GenericResource - Any entry in this list are always dropped for each chop on the corpse, regardless of the LootWeight or DropChancePercentage
SpecialResource - If you want certain resources to only drop once in a while, you can set up Weights and DropChancePercentages here
LimitedResource - Any entry here will work just like the Special Resource entry, but can be modified by the "DropOneLimitedResource" flag to only drop once.
MonsterStatTable
The entry here determines Health, Armor, XP and various other stats for the monster. The values in here may be new and so it's worth going over the basics of them (we will not be going over these in any real detail - suffice to say that the three first ones are the ones you really care about - the other ones are there for AI purposes)
MonsterHealth - determines the maximum health of the monster/pet
MonsterArmor - determines the maximum armor of the monster/pet
MonsterXP - determines the XP granted by killing the monster/pet
KBDefense - not used anymore
AILOD1Distance - This determines the distance, measured in Unreal Units, of when the monster base AI activates. You don't need to worry too much about this, unless your monster/pet starts to become unresponsive or overly aggressive.
AILOD2Distance - This determines the distance, measured in Unreal Units, of when the monster base AI activates. You don't need to worry too much about this, unless your monster/pet starts to become unresponsive or overly aggressive.
YawRotationRate - This value determines how many degrees in a single second the monster/pet can turn
PredictionHistorySeconds - Used for ranged combat and for pathing
PredictionOffsetSeconds - Used for ranged combat and for pathing
With the pet blueprint now set up, it's time to take a look at the ItemTable.
Step 2 - ItemTable
With a large chunk of work out of the way, it's now time to set up the data in the ItemTable. You will need:
-
The pet
-
This is the entry used in the actual inventory for placement of the pet. Your main pet entry in the ItemTable needs to have the "Spawn Template ID"set up - more about this below.
-
-
The corpse of the pet
-
When a pet dies and is harvested - or decays from not being placed in a pen, the pet should decay into this corpse item
-
-
Any specialized food you want to use for the pet
-
Any new/altered attacks for the pet
This part of setting up a pet is the most basic, and the main pet entry is really the only requirement. This needs to have a "Spawn Template ID"(the very last field in each entry of the ItemTable).
This template ID refers to the entry of the same name in the SpawnDataTable, and determines which SpawnTable to refer to when placing the pet down.
Step 3 - SpawnDataTable
The SpawnDataTable houses a number of important data for our pet - amongst others, the basic name for the pet, the Stat Tempalte for it, and the actual link to what blueprint to spawn, and so forth. We will go through the entries in this table in detail below (a fair amount of them are not used for pets, and so will not be listed below).
SpawnTable/
Name - This is the default display-name for the pet and is shown unless the player renames the pet.
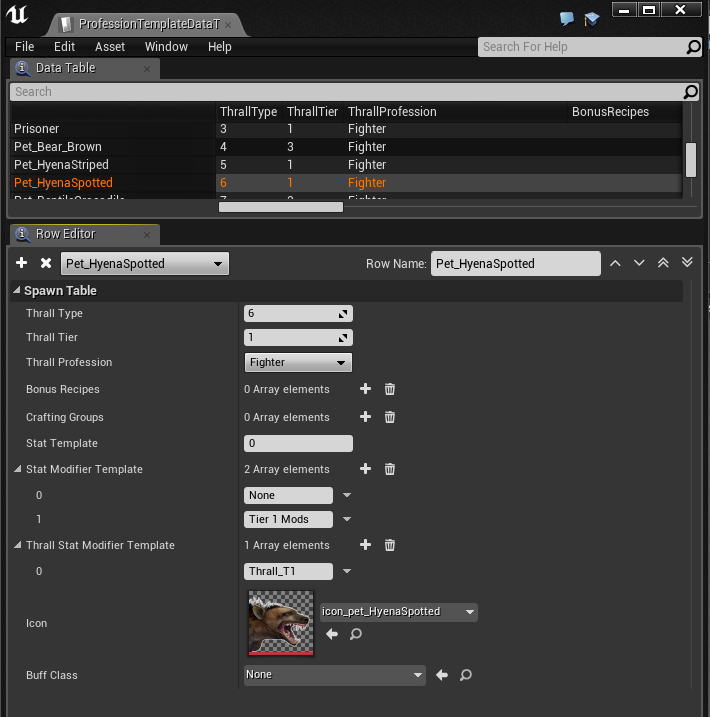
Profession Template - This is important because it will link to the profession-table that in turn sets a profession enum on the pet through the ThrallDataTable (more about this later). This entry needs to be unique to the pet.
Stat Template - this determines what basic stat template to use for the pet. This determines things such as consciousness, modifiers to knockback, etc.
Stat Modifier Template - this takes the stats from the Stat Template, and multiplies them with values from here. Not really used for pets but could be if you choose to.
NPCClass
- This needs to link to the blueprint for the pet.
Behaviour Tree
- determines the basic behaviour of the pet. For most pets this should simply be set to "BT_SimpleAttack".
AIController - This needs to be set to "CreatureAIController"
LootTable - not used for pets, but you can hook up additional loot-tables here if you like.
Npc Tags - for followers, this is important as it determines the maximum amount of thralls you may have of this kind, should the NPC be thrallified. See the “ Creating an NPC ” guide.
Thralls/
NPCBehaviour Parameters - should be set to "BP_DefaultNPCBehaviorParameters"
Step 4 - Profession Table
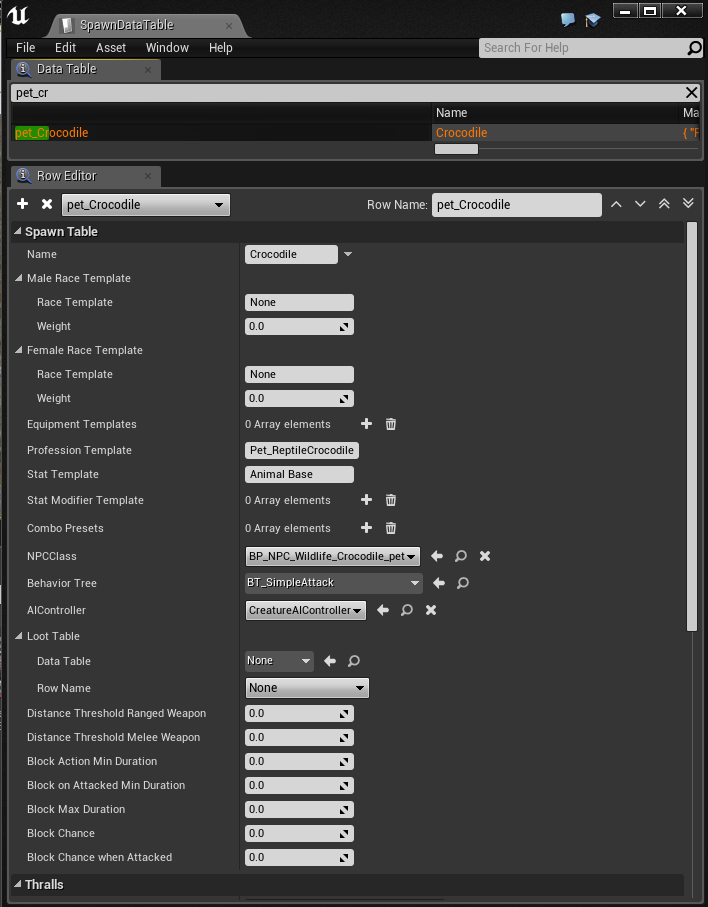
The profession table is required in order to assign a placed thrall a Type. The entry in the item-table for a Crocodile looks like the image on the right.
The important thing to know here is that each Thrall Type for pets needs to be unique. This will be used in the next step.
In addition, you may want to set up a custom icon for your monster here.
All the other stats in this table are not used for pets and should be ignored. Some of these stats have been covered in other guides, and some of them are self-explanatory, so we won't be covering them here.
For our example with our new Komodo-pet, here we would set a new value for Thrall-type - for example "588".
Thrall Groups
Followers can belong to multiple Thrall groups. Each thrall group has a maximum cap of simultaneous followers assigned, defined in the “ ThrallGroupTable “; A “Warrior” entry, for example, has a maximum cap of 1 and is incompatible with SorceryHorde and SorceryDemon. This means you can have either, but not both, at the same time. Mounts, however, are compatible with every type of other thrall, so you can always have a mount with you.
This now needs to be linked to the final step of the basic process of getting our pet done - the ThrallDataTable.
Step 5 - ThrallDataTable
The ThrallDataTable is an important table for our pets - it determines the dietary requirement for the pet, and is the final link to the blueprint. It also cements the thrall component into the pet once it has been converted. Some of the data here is replicated from tables used before this one but do take the time to set it correctly here as well.
Thrall Actor - this should be set to the pet blueprint
Thrall Component - this should be set to "BP_ThrallComponent"
Behavior Tree - this should be set to "BT_SimpleAttack"
NPCBehavior Parameters - this should be set to "BP_NPCBehaviorParameters"
Diet
Each pet (and thrall) have their own dietary requirements. While pets can eat anything that is considered a food item (including rotten food), it's much better to feed them food they actually like, and this table determines what those foods are.
Each entry in this list consists of a Row Name and a Nutrition Amount. The Row Name is the ItemNameToTemplateID equivalent to the ItemName (essentially, it's the human-readable form of a Template-ID).
The Nutrition Amount determines the type of buff granted to the pet when the food is eaten.
Specifically - NutritionAmount 1 starts the buff
/Game/Systems/Buffs/MiscBuffs/BP_AC_Buff_PetThrall_WellFed1
and NutritionAmount 2 starts the buff
/Game/Systems/Buffs/MiscBuffs/BP_AC_Buff_PetThrall_WellFed2
Now that we are done with this, the pet should be possible to spawn and be placed, and we are done with the entire process! Sort of. We do need to make the recipe for the actual pet as well, so let's talk about that.
Step 6 - Recipes Table
All core game pets require you to put a baby into a pen. If you want your pet to be obtained in some other fashion, you don't need to hook up anything in the RecipesTable. However, in the interest of covering as many areas of the pets feature as possible, here is how it works:
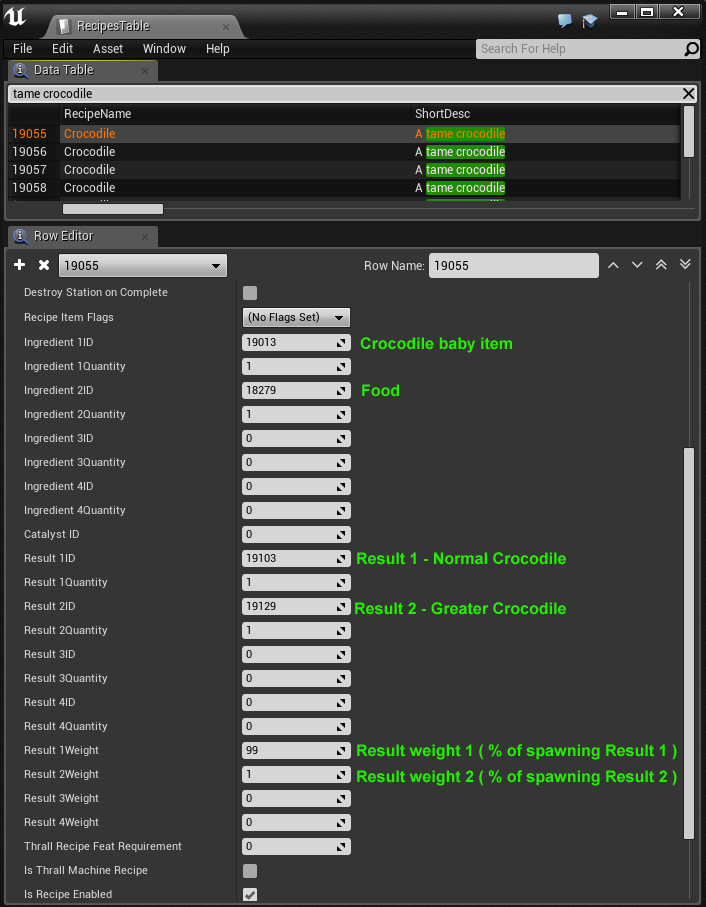
For core game pets, there is an element of random chance when you rear a pet. Giving pets food they enjoy in the animal pen will have a higher chance of resulting in an Epic Version of the pet. Epic pets are hooked up as items just as we have described above, but with better stats for damage and health.
In the recipe-table, the way this works is that each pet food that the pet likes (for crocodiles, there are a total of 7 different foods) has an increasingly better chance of making your pet into a Epic pet.
This system uses the new Crafting functionalities of additional ResultItems and ResultWeights.