This tutorial will teach you how to set up a basic camp in Conan Exiles. It will not detail everything about everything but will cover the basics so that you can set up a camp with enemies, destructibles and loot-chests in the game.
Before you start reading this tutorial, you should have some basic grasp on how levels and navmesh may be affecting your camp. However - for the most part, it should not be an issue. At the end of this document, there is a short write-up about this, but we won't cover it in detail.
Camp Structure
Camps in Conan Exiles consist of three main types of functions : A TerritorySpawner, a CampOwner and a number of Assets. These assets can be camp assets (such as decoration pieces, torches, bonfires, bedrolls, etc), treasure chests, NPC spawns or any other actor blueprint.
Territory Spawner
The NPCTerritorySpawner blueprint can control a number of things as far as the camp is concerned. However - for this tutorial, we'll only concern ourselves with the important ones.
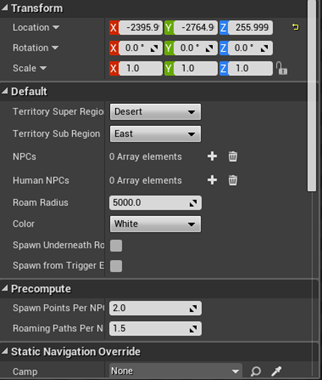
Roam Radius
This is the distance from the spawn point that the spawned NPCs are allowed to walk. It defaults to 5000, which may be quite a lot depending on your preference.
If you want to lower this, I recommend trying settings around 750-1250 for smaller to medium camps. This affects all roaming NPCs assigned to the camp
Spawn Underneath Roof
When Conan Exiles attempt to spawn NPCs, it finds the spawnpoints and traces a line from the sky downwards until it hits the ground.
When this option is clicked it instead draws a line from the spawnpoint. This is very useful if you have NPC's that spawn inside caves or complex structures with walls, ceilings and so forth. For the most part, you can simply turn this on.
Other options
You may notice there are other options such as "Spawn Points per NPC" and "Roaming Paths per NPCslot”. These are no longer used and are being phased out.
CampOwner
Next, we will need a CampOwner. The CampOwner is what links the TerritoryManager to each camp assets. You will need a CampOwner for each camp you create - it is what observes what should spawn and when. The CampOwner has no settings that is important for setting up a camp. However - please do look at the "Other tips and notes" at the end of the document where we go through how you can remove assets from a camp by using the BP_CampComponent for this blueprint.
Camp Assets
Camps can spawn any actor blueprint as part of it's spawn functionality. This is how you can set up NPCs as well as treasure chests or decorative pieces. This is the bulk work of the camp placement, and here we will go through each type of asset and how to use them.
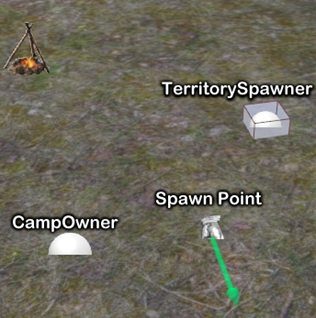
NPC Spawnpoints
We will start with the most important camp asset - NPC spawn points or "BP_ManualSpawnPoint" to give it it's correct name. When you drag a Spawnpoint into the editor, you will see something similar to the image on the right.
The green arrow determines the facing of the NPC when s/he is spawned. You can rotate this as you do any asset in the viewport.
In the details window, you can see a number of important options for spawning our NPC. Before we start on those - a clarification on the difference between "Wildlife Options" and "Human Options": There isn't one. The Wildlife Option and Human Option are the same thing but was used early on in the project to make it easier to distinguish spawns that were using humans versus spawns that were using creatures. Feel free to use them as you see fit, see below.
Selecting which NPC to spawn
By expanding the Human/Wildlife Options, you get a number of possible setups. The only one you truly need to be aware of here is the "SpawnTable" entry. This is what determines what NPC to spawn in the spawnpoint.
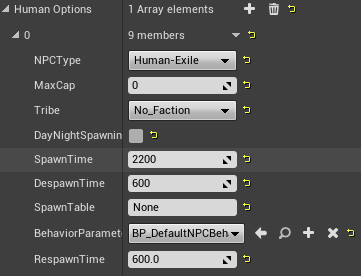
There is a very simple method of finding out what you can put here. Find and open the WeightedSpawnTableRow table. This table contains all the different possible spawns in the entire game. What you are searching for in the table is the Weighted Table ID.
For example, if you search for Rhino, you will find all the rhino entries, and searching for "Darfari" will get you all the Darfari entries.
IMPORTANT: Even though there is a dropdown for “NPCType”, don’t use that – put the name of the WeightedSpawnTable into where it says “Spawntable: None” (NPCType is a legacy support item but nothing new uses it)
Note: The best procedure for making the camp is to first decorate it and then place spawn points. Here we are showing NPC spawn points first because it is simply more important.
Allow Respawn
This should be self-explanatory. It is on by default - if you uncheck this, the NPC will not respawn if destroyed in the game.
Is Guard Spot
If this checkbox is ticked, the NPC will not move from it's spawn point unless attacked or an enemy is spotted. This is useful for NPCs that perform emotes.
Emote State
Defaults to "None" but this drop-down list gives you access to a number of emotes that can be played for the NPC. If an NPC does not have access to the emote, none will be played. If you are uncertain if a creature or humanoid can play an emote or not, you can check the EmotesDataTable - find the emote in the table and see what skeleton the emote is compatible with.
Patrolling NPCs
Patrolling NPCs require their own CampOwner and TerritoryManager. The first thing you need to set up is a single spawn point that contains the NPC you want to patrol - once you have that working, and the NPC spawns, we can set him/her/it on a patrol.
Note: Make sure the spawn point is not set to "Is Guard Spot"
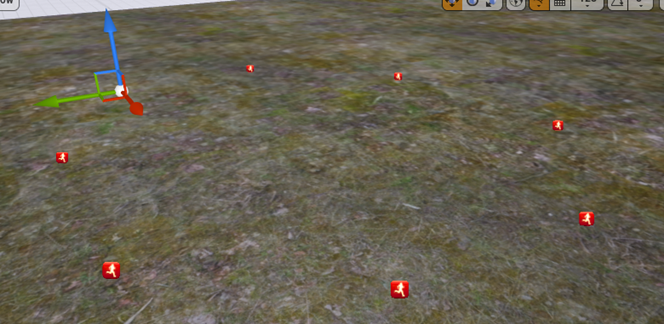
Next, find the /Game/Systems/AI/Navigation/BP_ManualWaypoint blueprint, and drag it into the level where you want the different waypoints to be. Your NPC will traverse in a straight path (if possible) towards each of these, so it may pay to put in quite a few of them unless you want your NPC to run very long straight stretches.
Your path may now look something like this:
With all these waypoints still selected, start the "CampBlutility" and press the "Connect Waypoints in Order" button.

Once you have done this, you should also add these waypoints to the camp by pressing the "Add Selected to Camp".
Note that you won't see any lines between these points until you move them ever so slightly in the editor (thus forcing an update).
You will also note that the last waypoint in the list is not connected back to the first one.
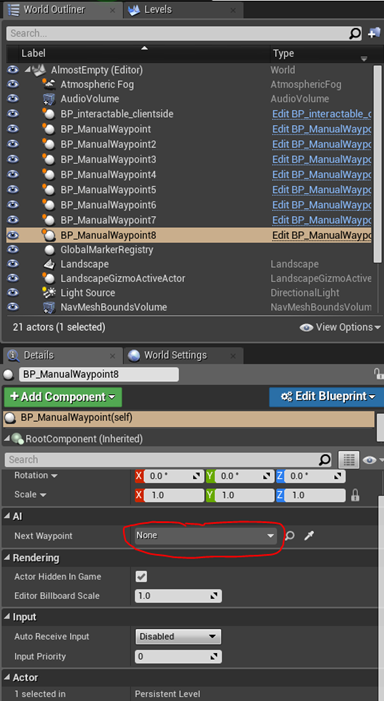
If you want to do this, you will need to make the final connection manually by clicking the "BP_ManualWaypoint" in the level, then go in under the AI/Next waypoint setting and using that dropdown to find your waypoint.
Treasure Chests
Treasure chests are blueprints that contain loot. You will first need a loot chest.
/Game/Systems/Loot/New/
contains the two basic chests we use in the game:
-
BP_PL_LootChest_Metal
-
BP_PL_LootChest_Wood
The only difference between them is the visual. You will also see two other chests in that folder - those two are not used (yet).
When assigning loot to a chest, you first place the chest in the world, then click on it, and edit the default loot-table variable:

Any non-weighted loot-table can be assigned to this variable.
Decoration Camp Assets (BP_CA_xx)
There are a number of premade blueprints made for this, located in the /Game/Systems/Camps/Resources/ folder.
You may use these blueprints, but they are being phased out, since it’s better for optimization purposes to use Static Meshes and Skeletal Meshes.
Tying the camp together
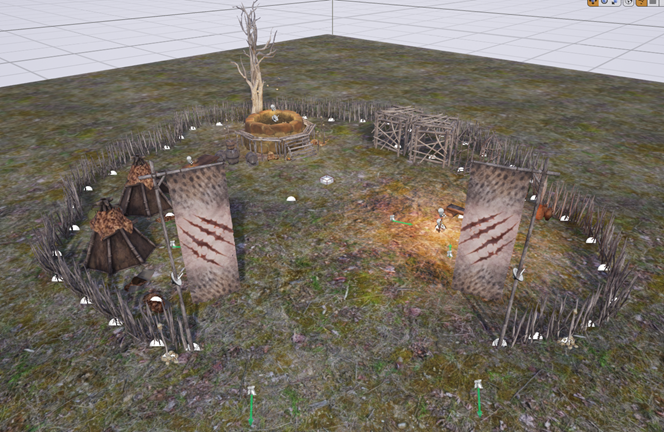
Now, with all the camp assets placed, your camp might look something like this; complete with spawn points, decoration pieces and possibly even a treasure chest or two.
If you have pressed play at this point, you might have noticed that the NPCs stubbornly refuses to spawn. In addition, you might have noticed that if you destroy the placed decoration, they do not respawn until you restart the game. This is because we haven't tied the TerritorySpawner, CampOwner and Camp assets together. So let's do that.
Find the CampBlutility in the Content Browser and open it - this tool allows you to quickly add assets to your camp. Now - mark your entire camp in the world outliner (including the CampOwner and TerritoryManager) and in the blutility click "Connect Territory with Camp" and "Add Selected to Camp".
You can do this however many times you like - the blutility will not double up on assets or accidentally remove or replace them.
Press play, and enjoy your camp setup!
Other tips and notes
Removing Camp assets from the CampOwner
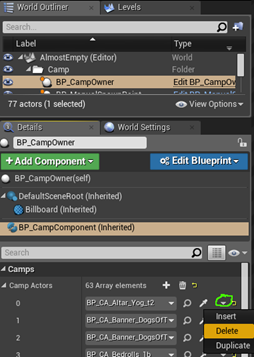
If you need to remove camp assets from the camp owner, the easiest way is to simply delete them from the level, mark your entire camp structure again, and through the blutility click "Add Selected to Camp" again. However - if you (for some reason) don't want to do this - or can't - it's possible to delete individual assets from the CampOwner by accessing the BP_CampComponent, and deleting individual entries in the array.
Levels
Conan Exiles uses multiple levels as camp levels and it would be a good idea to use one of these. However, if you are not, you should be aware of the LEVEL BOUNDS in each level. This determines the area the level covers. If you place something outside the level bounds, you won't be able to see it in the game. This is one of the most likely culprits if you can't see your camp assets spawning (if you are using custom levels).
Navmesh
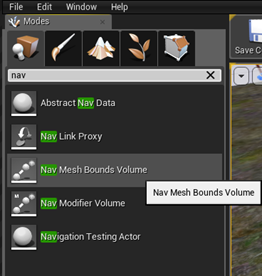
Another issue that may occur is that the Navmesh does not cover your area. In order to correctly place a Navmeshbounds, drag one from the Modes window and scale it up to cover the area that does not have navigation.