Setting up special effects on equipping Armor
If you want your armor to do special things when equipped, you should make a child of the "/Game/Items/BPGameItemArmor" blueprint and link the itemtable to this blueprint. Open up your copy of the blueprint and search for "Buff" and you will find this:
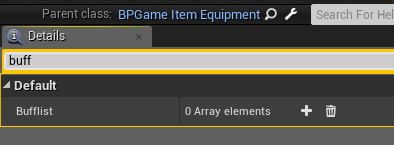
This allows you to select a buff that will be placed on the player when the item is equipped (and also removed when unequipped). Be careful about this and take the following in consideration:
• Buffs to not persist through logging out and back in
• Taking the item off means removing all instances of the same buff, so having the same buff from many different sources is not a good idea.
How arrows work in Conan Exiles
When an arrow is fired, two blueprints are used - the Item Class blueprint, and the Visual object blueprint.
In the Item-Table, the Class should point to "BP_Item_BowProjectileBase", whereas the Visual object blueprint (in the itemtable arrow entry) is the actual missile itself while in the air. This is the blueprint that collides with targets/the world/other meshes.
Another important note is that if you have created a new arrow-type, you will need to edit all the Bow-entries in the game to accept this new arrow as actual ammunition (the item-table entry for all bows have a "Compatible Ammunition" list entry).
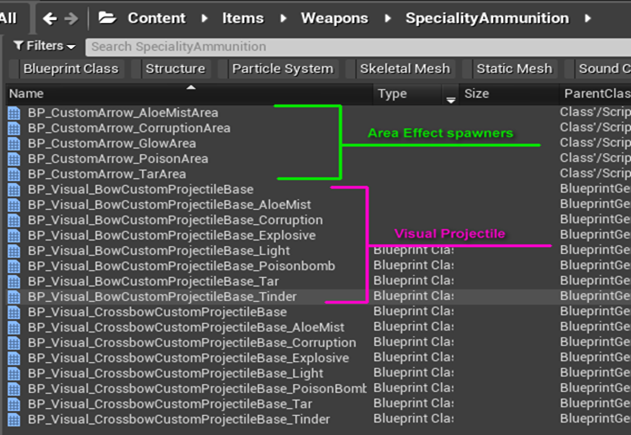
The special arrows in Conan Exiles basegame can be found in this folder:
/Game/Items/Weapons/SpecialityAmmunition/
You will want to create a new child of the BP_Visual_BowCustomProjectileBase blueprint.
Basic Special Arrow blueprint settings
All special arrows in Conan are children of the "" blueprint, which has a number of settings, so let's go through these first, since these are the most generic settings for an arrow.
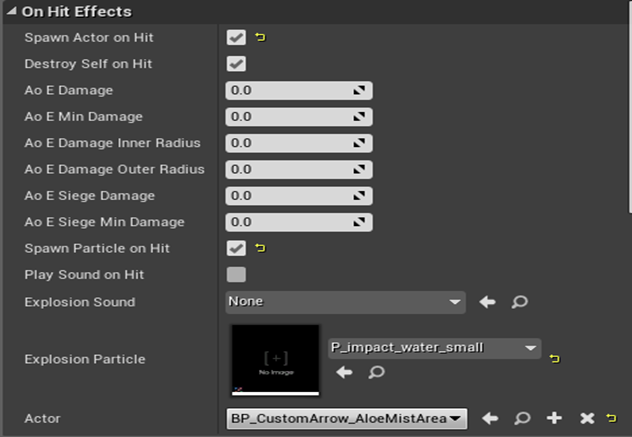
Spawn Actor on Hit (default off) is required if you want the arrow to spawn an actual lingering effect (more about this later).
Destroy self on Hit (default on) makes the arrow destroy itself when it hits a target
AoE Damage (default 0) is the amount of maximum damage the arrow does on impact within a specific radius - this damage is affected by falloff
AoE Min Damage (deault 0) is the amount of minimum damage the arrow does on impact at the outer edge of the radius
AoE Damage Inner Radius (default 0) is the inner radius distance of the AoE damage
AoE Damage Outer Radius (default 0) is the outer radius distance of the AoE damage
AoE Siege Damage (default 0) is the amount of maximum siege damage the arrow does on impact within a specific radius - this damage is affected by falloff
AoE Siege Min Damage (default 0) is the amount of minimum siege damage the arrow does on impact at the outer edge of the radius
Spawn particle on hit (default off) should be ticked if you want a speficic particle to spawn at the location of the impact)
Play sound on hit (default off) allows you to play sounds at the impact location if you want
Explosion sound (default "none") is the actual sound to be played by "Play sound on hit"
Explosion particle (default "none") is the actual particle to be played by "Spawn particle on hit".
Actor (default "none") is the actor to spawn on arrow impact. This can be further modified to create a number of lingering effects (see below)
Lingering effects
You may want to create special arrows that produce lingering effects, such as oil on the ground, smoke, tar or other effects that grant buffs/debuffs to the area.
Some of the existing arrows have buffs attached to them - the easiest way of making a new lingering effect is to simply take one of these (for example, the "BP_CustomArrow_CorruptionArea" blueprint), copy it and replace the "Hazard Debuff" in the details-window with a buff of your choosing.
This blueprint also allows you to adjust the radius of the buff and particle for the lingering effect.
Adding gameplay effects to weapons
Types of Weapon Blueprints
There are two weapon blueprint types we will look at in this guide. First up is the Visual Blueprint, and then we will look at the Item Class blueprint.

You can find them in the item-table (see image on the right). This is where you will need to assign them to your weapon once you've created it.
Visual Blueprint
The visual blueprint determines how the weapon will show up visually (that almost makes sense!), meaning, you can control almost any aspect of the weapon through this blueprint - you can also add lights or other features to it if you want to expand it.
Worth noting is that you should always make a blueprint the child of a pre-existing blueprint. In the example to the right, the basic blueprint is "BP_Base_Visual_Axe2h", and so if we wanted to make a special axe that glows in the dark, we should make a child of this blueprint and add our functionality in that one.
If you open up the Axe visual blueprint, you can see that the logic for it is completely empty. That's because most weapons don't have fancy things attached to them, so all the changes you might want to do will need to be functions that override the functions of the parent.
If you open up the Dagger visual blueprint however (BP_dagger_dw), you will see that this blueprint has quite a lot of logic attached to it. Most of this logic is about copying the visual mesh for the dagger, turning it 180 degrees and attaching it to the left hand for the avatar. So - if you want your one-handed sword to be duplicated into the left hand, here's where you can implement the same kind of overrides as in the dagger blueprint.
You can also add components like Lights and Particles and audio-components into the Components-list, like with the "BP_Torch_1h" or the "sword2h_legendary_glow" (this is the visual blueprint for the Jedias Greatsaber weapon).
Item Class Blueprint
The Item Class Blueprint is where most of the really nifty stuff exists though. Most (but not all) of the weapons use the "BPGameItemWeapon" item class. The weapons that don't have other custom functions already built into them, but ultimately they will all be the same, barring these special functions.
Details Pane - how to add buffs
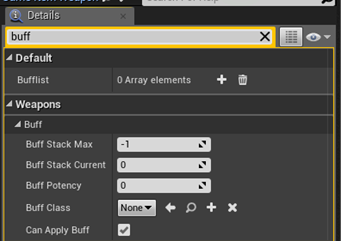
One of the easiest things to add to your weapons are buffs. Searching for "buff" in the Details pane will show you something like the image on the right. So let's go through those entries first.
Bufflist
This list of buffs allows you to run buffs when the weapon is equipped. This allows you to put any kind of buff on the player that uses the weapon - do you want a weapon that poisons the player that uses it? Here's where you put it.
What about a weapon that corrupts the player? Or heals them? Or Cripples, Corrupts, poisons and Bleeds them all at the same time? This is the place.
You're not limited as far as the amount of buffs go but it's generally good practice to not add too many here. This is also not the place to put bonuses to Stats like Strength, Agility etc (you can, there just happens to be a simpler way, which is covered in the file "Primer - Armor Bonuses.pdf" included in this .zip file - I know it says "armor" but the same is true for weapons there.).
Buff
Under this heading you can find a lot of buff entries. Mostly, you're not going to want to change these values, as they change during runtime of the game. However, there are two interesting things here:
Buff Class
Buff Class is the buff you want to run on the target when hit by the weapon. This buff is limited to only a single entry, but you can easily make a single buff that starts other buffs. We won't cover how in this guide, but you can check out the "Creating Buffs.pdf" included in this .zip file for a basic guide about buffs.
Can Apply Buff
This is a very badly named entry. It has nothing to do with the buffs mentioned above. In fact - this determines if your weapon can be poisoned or not. If you have a special weapon and someone applies a poison to it, this will overwrite your buff, so if you don't want that to happen, you should untick this box. It does mean you can't poison the weapon, but... you can't have everything. And of course, there are ways around this as well, they just won't be covered in this guide as it's intended to just get you started.