About this guide
In this guide, we will go through how to create a placeable. For the guide, we will assume that the actual itemtable work has been done, and that it has been linked to the blueprint.
If you are uncertain about this step, please look at the existing item-tables, find a placeable (for example, one of the Chairs) and copy the data from that entry. We will go through the important entries in the ItemDataTable although they are very few.
For a good part of all placeables, it'll be enough to copy an existing blueprint and use that and simply change the StaticMesh (or SkeletalMesh) for it.
However - if you want some extra functionality for your placeables, such as sitting (for chairs and benches), wall-placement (for torches) or ceiling placement (hanging braziers) etc, feel free to copy one of these blueprints instead:
-
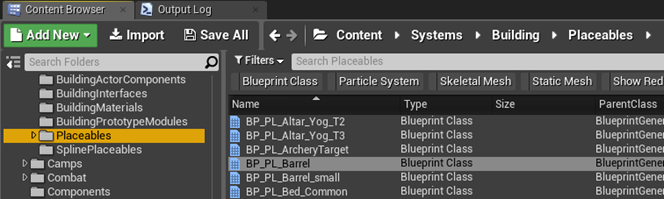
BP_PL_Pottery_1
-
Small placeables like mugs, pottery, jars, etc (unless it is a candle)
-
-
BP_PL_Candle_White
-
Candles (provides a minute amount of light)
-
-
BP_PL_Table_1
-
Medium sized placeables without any real functionality
-
-
BP_PL_Horn
-
Placeables that make a sound when interacted with
-
-
BP_PL_Brazier_ceiling
-
Placeable hanging from the ceiling. Has light, but easy to remove.
-
-
BP_PL_Torch_Standing
-
Any ground-placeable that provides light and/or heat/cold effects
-
-
BP_PL_W_Torch_Gas_Wall
-
Any wall-placeable that provdes light and/or heat/cold effects
-
-
BP_PL_W_Trophy_Antilope
-
Any wall-placeable without any real functionality
-
-
BP_PL_Bed_Common
-
Any placeable with bed/respawn point functionality
-
-
BP_PL_Chest_Large
-
Any placeable with an inventory
-
-
BP_PL_WallPalisade
-
Any placeable that does damage to the player when touching it
-
-
BP_PL_Water_Well
-
Any placeable that fills up with water
-
Placeable datastructure
We will touch on the important settings here and not go through all of them, as many of the settings are not used to set up the placeable, but rather used by the game itself while/when placed.
Default
Can be Rotated, Can be Height Adjusted and Can be Tilted - these settings turn on/off the players ability to adjust the rotation for the object in game.
Place On Wall - this makes the placeable ignore checks for the ground(terrain) and instead checks for walls and other placeable vertical surfaces.
Max Tilt Angle - Change this if you want you increase/decrease the maximum tilting angle when placing the object.
Placement Sound/Removal Sound - these two links to sounds that trigger when placed and removed.
Show Direction arrow - some placeables have functions, such as the chairs, which you may want to use this for. Checking this option will display a directional arrow while the placeable is being placed.
Can be dismantled - if this is unchecked, the placeable cannot be dismantled after it is placed.
Can stack on top of self - if this is checked, it is possible to stack the object vertically.
Place only in water - if this is checked, you can only place the object in water.
Place on ceiling - if this is checked, the placeable can only be hung from ceilings
Container
Is Container locked - If this is checked, the container is locked as soon as it is placed in the world.
Is Container lockable - If this is checked, the container can be locked and unlocked after being placed.
Crafting Groups
For this guide, we won't go into crafting machines - if you want to craft a crafting machine, there is another guide for that.
Building
Destroy actor on zero health - If this is unchecked, it's not possible to destroy the placeable.
Drop Inventory Content on Destroy - If this is unchecked, any inventory of the placeable is removed from the game when the placeable is destroyed.
Destructible mesh - Having a destructible mesh is not a requirement but for larger placeables it may look odd if the mesh simply disappears from the game when destroyed. It is very easy to create a destructible mesh, and there are good guides out there for this, so we won't go through that here.
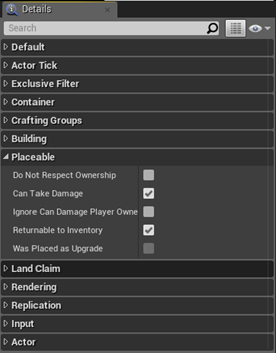
Placeable
Do not respect ownership - If this is checked, it allows anyone to pick up / interact with the placeable as if they themselves had placed it.
Can take damage - If this is checked (as it is by default), the placeable can take damage.
Ignore Can Damage Player Owned Structure - A candidate for the longest variable name ever, this override allows players to damage this machine even if the server settings says they can't.
Returnable to Inventory - if checked, allows picking the machine back up into the player inventory.
Specific Functionalities
Lightsources (candles, braziers, torches, etc)
If you have copied any of the candle or torch blueprints, you may have noticed that there are point-lights and particle systems attached to the blueprint. In addition, there is a component called "BP_BAC_TurnLightOnOff".
This component is what makes the placeable turn on and off the light. You can add as many particles and point lights to the placeable as you want - adding this component will turn on/off all of them when it is interacted with.
Playing sounds (horns, drums, etc)
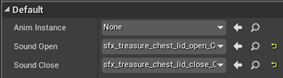
If you want to have your placeable play sounds, you will need the "BP_BSC_MulticastSound" component. Once you have added this component to the blueprint, you can access a new variable in the Default/ section of the Details-window called "Sound On Activate".
This allows you to hook up any sound to the blueprint and will automatically trigger it when the placeable is interacted with by a player.
Damage On Player Contact
If you want to have a placeable that, when touched, damages the player, you will need to make it a child of "BP_PL_DamageOnContact".
Once the child blueprint has been created, you will see that you have an additional checkbox called "DamageContactBox" - this functions as a collision detection box and once players touch this box, they will take damage.
Waterwells
Waterwells should be created as childs of the "BP_PL_Water_Well" blueprint. This grants you access to two new components:
WaterMesh - This is the actual water mesh used for the visuals of water filling the mesh in the world.
WaterSpline - This determines the low/high points of the watermesh and allows the watermesh to travel from the bottom to the top as the water fills more and more.
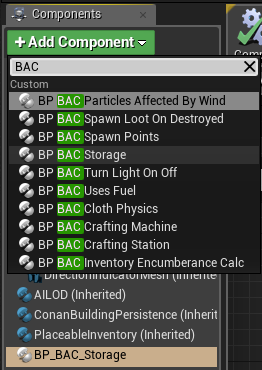
Storage Containers (chests, cupboards, etc)
When you are creating a storage container, you need to make certain that it is a child of the "BP_Placeable_Item_Container" blueprint and has the component " BP_BAC_Storage" added to it.
After you have done this, it's a simple matter of setting up animations and sounds (if you want them) in the settings for the "BP_BAC_Storage" component.
Perish Modifier
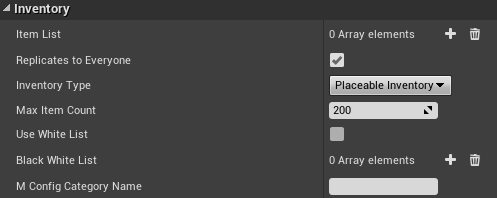
- You will find that the PlaceableInventory component has been added to the blueprint; this gives you access to a fun little option in the Durability section of the details-window called Perish Modifier. This controls the speed at which perishable objects such as food decay while placed in the blueprint. You can set this to 0 to disable decay completely, or crank the numbers up higher if you want a faster decay rate.
Once you have done this, you will need to make sure that the ItemTable has the correct data in it (See the section "Important ItemTable Data" at the end of the document).
Black White List
If you want your inventory to only accept certain items, or perhaps ban certain items, you can use the function "Black White List". By default this array is empty; adding ItemTemplateID's to the array will make the list work as a black list and prevent adding items of these ID's to the inventory. The reverse is true if you click "Use White List", which then treats the list as only allowing the items in the list to be placed in the inventory.
Chairs
For any sort of placeable you want players to sit on (chairs, benches, etc), you will need to make it a child of the "BP_PL_Chair_Master" blueprint. This will make sure that the "BP_BSC_Sit" component is added to the blueprint, which you will need to adjust in the Viewport to make certain the location is correct.
Overlap boxes
Overlap boxes determine where in the world it's possible to place the actor. There are a number of them available, all detailed below.
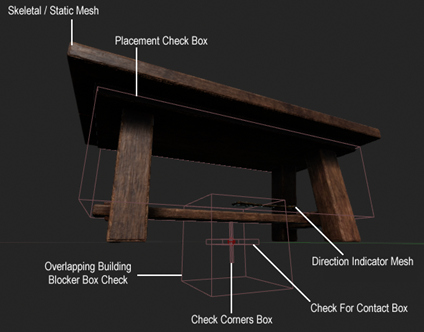
Placement Check Box
This check box is primarily used to check if the placeable is colliding with another placeable or building piece. You can think of this box as a collision box in terms of placement
OverlapBuildingBoxChecker
This is the main method of generating overlaps for the building piece – Characters, foliage, actors
and no-build zones, amongst other things are checked using this.
CheckCornersBox
This is primarily a helper for the other boxes. I won't go into the details of how the box works, but in essence, it is used in conjunction with the other overlap boxes to generate overlaps. You can think of this box as a nail that needs to be hammer into the surface where it connects, be it the ground, ceiling or wall. You will notice that for trophies (for example) this box is not vertical but horizontal instead.
Check for Contact Box
This is the box that determines the center of placement for the actor. It's usually fine to leave this as is it but if you have very large or very small placeables, you may want to adjust this to make the actor find the ground, ceiling or wall easier. This is, in essence, a connecting surface.
Direction Indicator Mesh
If you are using this setting, this is the placement arrow that shows up while placing it.
Important ItemTable data
Besides the BuildingClass (that should link to the blueprint for your placeable) there are some other ItemTable entries that are good to know about.
Items section
Item Container Size
- this is used to determine the amount of inventory slots your placeable has - IF - your placeable has the BP_BAC_Storage component added to it (for chests as an example)
Durability section
Building Max Health - This determines the health of the placeable.