About this primer
This primer is a slight re-write/formatting of the internal Funcom modelling guide, written by Jenni. All credit to her for giving this information out. This primer will not go through every detail about modelling armors/clothes for Conan but there may be information here that is otherwise obscure.
Rules of the modular character system
Chestpiece: should end at the seam between Upperbody and Lowerbody with a slight leeway; it can extend a little lower but the extension should be thick enough to fit over the waist areas of most bottoms. It's safest to cut off precisely at the seam.
Chestpieces can be long-sleeved down to the wrist, and we have a tucking feature, in which equipping long gloves can switch the chest model to an alternative '_tucked' version. The _tucked model should always end at the seam between the Upperbody and Forearms.
Bottom : can begin at the seam between Upperbody and Lowerbody or lower. Should be close to the body until around crotch height, at which it can flare out more. Can go all the way down to ankles, in which case it also needs a _tucked model to fit into boots. The _tucked bottom is cut off at the seam between Lowerbody and Legs.
Hands : Can be short gloves or long gloves or jewelry, bracers etc. Short gloves should go up to the wrist. Long gloves should go up to the seam between Upperbody and Forearms and completely cover the seam all around it.
Feet : Same convention as hands. Either max. ankle height shoes (will not tuck bottom) or long boots that go up to the seam between Lowerbody and Legs, covering the whole circumference of the seam. Long boots will be set to tuck the bottom piece.
Head : 4 different available conventions. Full cover (hides head, hair and facial hair) which must also conceal the neck all the way down to the Upperbody seam. Open face (hides hair) which has the head model and beard displayed. Helmets can also hide facial hair if the design includes a mask.
Finally, headbands and circlets that don't hide hair, facial hair or the head.
The tucking and hiding rules are set in the EquipmentVariationTable under the Items folder.
Technically any asset can be set to tuck or hide any other part, but we use the following:
-
Gloves – long gloves are set to tuck Upperbody and hide Forearms.
-
Boots – long boots are set to tuck Lowerbody and hide Legs.
-
Chest – long-sleeved chestpieces are set to hide Forearms.
-
Bottom – long pants are set to hide Legs.
-
Helmet – can hide Hair, Head or Beard depending on design.
Modeling conventions
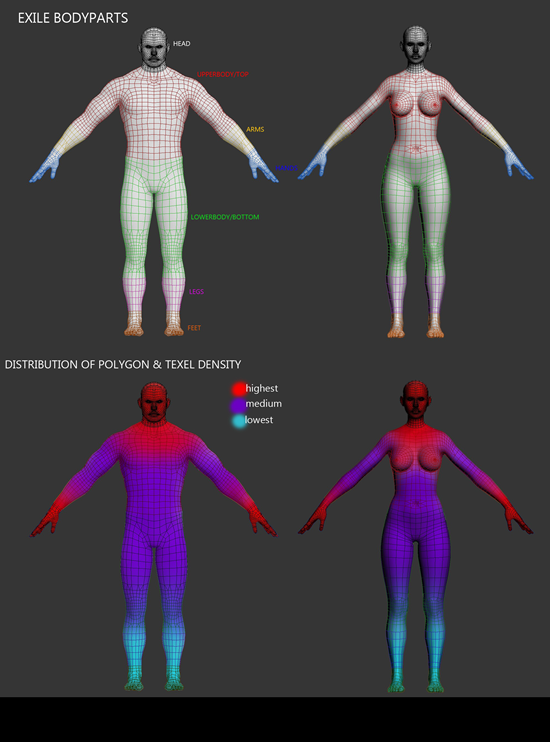
The detail and poly distribution of the model should be prioritized by how visible the piece is in average play. The priority is as follows:
-
Head, neck area and hands. These should be the highest poly density areas and have the most detail, as well as the most texture resolution & texel density (area occupied on texture map).
-
Torso and legs. We look at the characters' backs a lot but the midsection doesn't need that much poly or texel density.
-
Feet. Seen the least. Focus should be on silhouette and distant read. Spend the fewest polys and lowest texture resolution here. For the female figure, chestpieces should have extra poly density in the breast area to avoid blockiness when scaled up in character creation.
Complex mesh detail and patterns should be avoided in the chest area because scaling WILL mess it right up.
Necklaces should sit further up on the sternum on female chestpieces. When in doubt, look at the polygon flow and distribution on the bare body models for reference.
For form-fitting clothes and armor it can be a good shortcut to duplicate and scale the actual body geometry for a retopo base. This is particularly useful for gloves.
Texturing conventions & materials
Textures should always be authored in greyscale to allow for the dye system to take care of colours.
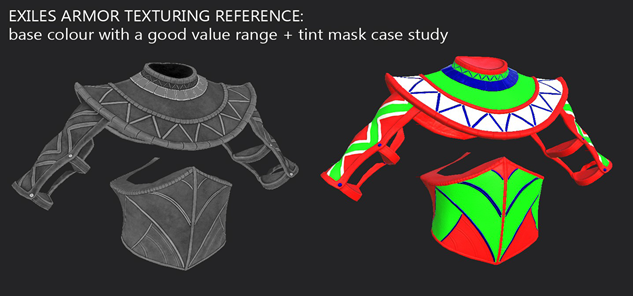
You can still preview the desired colour scheme by keeping a folder set to Hard Light in your Substance textureset and using flat colour fills in Normal mode inside that folder.
The textures should be kept in midrange values, with lighter greys and whites used for emphasizing wear, scratches and material definition, and dark greys and blacks sparingly used to add to ambient occlusion and cavity detail.
Each armor piece (per body slot) can have up to 4 dye channels which should be utilized as much as possible. Armors consisting of several materials will still be restricted to the same 4 colour channels as it's handled per equippable item.
Materials need to read clearly based on roughness, metalness and value, since colour is handled through the dye system. As a rule of thumb the materials on the armor should be obviously readable even if the player uses the same dye on every element.
Texture sizes: (estimated, some variety based on design and coverage and complexity)
-
Chestpiece & Bottom – 2k diffuse and normal, 1k masks, 1k tintmap, 256/512 cloth alpha
-
Gloves – short gloves 1k diffuse and normal, 512 masks, 512 tintmap, 256 cloth, long gloves 2k diffuse and normal, 1k masks, 1k/2k tintmap depending on detail
-
Boots – 512-1k diffuse and normal, 512 masks & tintmap, max. 512 cloth map
-
Helmet – 1-2k diffuse and normal (depends on complexity), 1k masks, 1k tintmap
Consider obvious exceptions like the helmet being a pair of earrings. That doesn't take 1k maps. The cloth map is a simple black and white mask to define areas where the fabric shader is applied. This makes materials like cotton look more physically correct. The map should be low resolution.
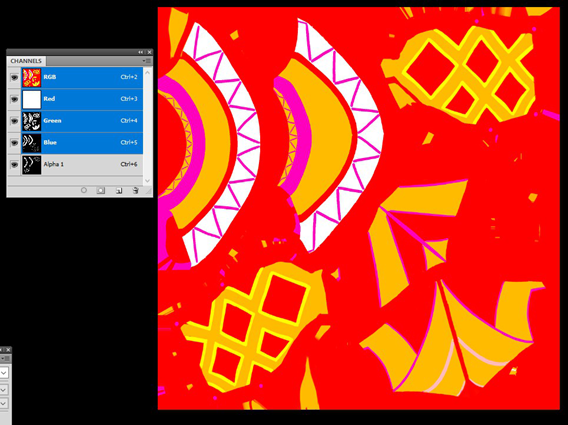
Authoring the Tint-Map
The tint (dye) map follows a simple logic of R+G+B+A where each consecutive channel gets layered on top of the former. Thus, R can be filled completely white and any white areas in G will be placed on top of it as another solid colour in the final material. Any white pixels in Alpha will in turn overwrite whatever is below them in G or B.
The masks don't have to always be solid black and white. In some cases it can be used to create gradiented tints, like in the reptile hide armor. This has to be used very deliberately and with consideration though.
It's by far the easiest to create the tint map in Substance by baking a colour ID map of the model and using ID picker to mask out areas in a colour fill layer. The alpha channel mask can be made in Substance by just using a white fill, exporting the map and moving the white areas to the alpha channel in Photoshop.
The tint colours are applied over the greyscale texture in UE with a Hard Light blending mode. Any area of the armor that should be excluded from tinting needs to be black in the tint map. A finished, correctly authored tint map looks like this:
Male to female armor conversion
The proportions of the bodies are very different, so quite a bit of careful scaling needs to be done, and stretching can happen easily if you're not careful. While the male figure has a strong V-shape and broad shoulders, the female figure has an hourglass shape and much narrower shoulders and slimmer arms.
If the female armor isn't made separately but converted from the male version, it's good to use the FFD4x4x4 modifier and Paint Deform to do most of the scaling and fitting to avoid distorting the mesh too much. For Maya users, this is called “Lattice” and you can find it under “Deformers”.
On the female figure it's particularly important to keep the hourglass silhouette, so the waistline needs to be nipped in – pay attention to where the narrowest point of the torso is and be careful not to lose it under the armor.
Waistlines should be moved to the appropriate body part seams. Long gloves are the trickiest to fit from male to female and it's best to work in an additional Edit Poly modifier so you can start over if the result doesn't come out as desired.
For trousers, bringing the low-poly mesh into Zbrush and fitting it to the female form there can be easier. Paint Deform under 3ds max Graphite Modeling Tools can also produce similar results, as it allows you to work with symmetry. Always keep the bare body parts as a reference point in your scene and fit the armor around them.
One exception to this is the chest area – breasts are shaped by what's worn around them, and they can be lifted and compressed. This depends on the armor so judge this case by case and ask when not completely clear. The chest area might also need additional polys to allow for scaling if it's been directly imported from the male version.
Polygons on the body that are not visible under the armor meshes are deleted. The body mesh is attached to the armor piece so it's possible to do things like optimizing body part geometry and changing the bust shape.
APEX Cloth Physics
In Conan Exiles, we use the APEX cloth tech.
Areas with cloth sim should have super clean geometry and no layered geo if possible. If there are layers they should be very thick, and the geo should be matched between the layers. Including edge orientation on quad meshes. That also needs to be matched.
The easiest case is a simple non-closed physics mesh like a loincloth, scarf, or a flap or a sash hanging off the waist.
The biggest challenge is a full closed skirt or something with a lot of bits and pieces on it.
Multiple flappy bits (reference Vanir armors for a good example) likely need to be split into 2 or more physics meshes.
If you're making earrings, we can reuse an existing physics asset from Items/Armor/Blackhand
Prepping the model for export into UE4
Make selection sets for each armor piece. Use Endre's SelectionSet tool from P4.
-
When body part seams are visible, eliminate them when possible.
-
Check that each piece is skinned, Skin Wrap any stragglers.
-
Check that everything that needs to use the same material in UE has the same material assigned to it.
-
If there are multiple physics assets, each part that uses a separate physics asset needs a unique material on export. Physics assets are assigned to materials in the engine so you need to break them up.
Notes on structural plausibility
As a principle, things should attach to other things in a way that makes physical sense.
-
Something should be holding the shoulderpad in place.
-
Seams have stitches.
-
It should be visibly possible to get in and out of the garment/armor.
-
Lacing should be visibly tied at the ends and loop through the material.
-
The strap holding the shoulderpad in place should probably have a buckle or some other kind of closure on it.
-
The open-fronted tunic should probably have a belt holding it together at the waist.
-
Clothing has seams where they're typically found – sides, shoulders, arm hole.
-
The edges or hem are probably trimmed or finished somehow (or conversely visibly frayed if unsewn).
-
Boots are either loose enough to be pulled up to the calf or have a closure of laces, buttons or buckles. They have some kind of soles, even if it's just a panel of thick leather.
Whenever you're making something, ask yourself how it's been put together and how you'd get in and out of it.
Character Artist's Modeling Checklist
Sculpt Stage
-
Base meshes made with clean low poly quad topology
-
Check silhouette and proportions against concept
-
Primary, secondary and tertiary shapes and detail reads
-
Check cutoff points at sculpt stage:
-
Waist seam
-
Long gloves end at arm seam
-
Boots reach leg seam
-
-
Color IDs assigned with polypaint - use high contrast colours: bright red, blue, green, yellow
-
Plan for retopo ahead of time - what's gonna be floating geo, what will you topo together?
-
Plan for male -> female conversion
Retopo stage
-
How much can you reuse from sculpt base meshes?
-
When topoing multiple sculpt meshes together, DYNAMESH reference mesh before exporting
-
Decimate ref meshes when needed
-
When in doubt, look at geo on the body mesh for reference
-
Glove geometry can be recycled from hand geo - simplify a bit
-
Ensure sufficient loops in high deformation areas:
-
Shoulders
-
Elbows
-
Knees
-
-
Does the geo contribute to silhouette? if not, it's probably not needed
-
Check for opportunities to optimize
UV Mapping and Texture Grouping
-
If it's going to use a tiling pattern, lay out the UVs vertically in the desired direction of the pattern
scale islands by needed texel density: the underside of a shoulderpad shouldn't get as much space as the visible topside -
If only one small part of the armor needs alpha opacity, make it a separate material and give it its own UV set
-
If you repeat a floating geo (like a buckle or a decoration) several times on the armor, only UV one piece & clone the geo
-
Check for distortions & overlapping or tangled UV verts
Exporting
-
Group lowpoly meshes by material (ie. all pieces being baked as 'top' have the same material)
-
Check naming conventions match between _high and _low meshes
-
Check that meshes are Editable Poly and have smoothing groups averaged
-
Export lowpoly as OBJ from max, set to Zbrush export preset, triangulated, preserve normals & smoothing groups
-
Export highpoly from Zbrush as OBJ with 'GRP' turned OFF under Tool > Export
Baking
-
Always do a test bake at low res first. it goes even faster when you ONLY bake normal. check for bake errors & address them
-
Set dilation to a high number
-
Set to 'Match By Mesh Name'
-
Bake normal, world space normal & curvature first with 2x antialiasing
-
Bake ambient occlusion, ID, thickness & position with no antialiasing, AO & thickness set to bake same mesh name only
-
When using ID to create opacity masking, bake with 0-1 dilation
Assembly and Engine Prep
-
Create selection sets for armor pieces
-
Check that body seams line up
-
Check that any visible body parts have Normal Thief applied (every time you change body mesh geometry, you will need to reapply Normal Thief)
-
The normals can reset for all sorts of reasons so use Normal Thief a lot. Just redo it before you export. just in case. it's worth it. It needs to be just under the Skin modifier on the top of the stack.
-
-
Check that every mesh is skin wrapped and has a skin modifier active
-
Check materials
-
Make _tucked meshes & export selection sets when necessary
-
Make AC physics reference mesh, reset vertex order by splitting it in a physics simmed area and merging it back together & welding
-
Make female conversion when applicable, repeat all of the above
-
Add extra geometry to bust area when necessary
-
Carefully match meshes to body seams
-
-
Export test model, check in UE
-
During import you have to:
-
Tick of "Import Meshes in Bone Hierarchy"
-
Tick of "Create Physics Asset" and change Physical Asset to None
-
Set skeleton to human
-
Normal Import Method - "Import Normals and Tangents"
-
-
Import textures to UE, open in property matrix
-
Change texture group from World to Character
-
Change texture group from World Normal to Character Normal
-
-
Turn 'SRGB' OFF for _M and _TM textures
-
Save
-
Create material instances
-
Adjust texture resolutions through Maximum Texture Size slider
-
Skin
Final Touches
-
Fill in data table entry under Items -> EquipmentVariationTable
-
Get item template ID from the Item Table, this goes in the row number line
-
Material drop-down defines what sound fx it has
-
Dye flags = which dye channels are available for piece
-
Place meshes in mesh slots & tuck meshes when applicable
-
Set tucking & hiding - gloves, boots and helmets can control these conditions, tops and bottoms typically don't
-
Test model ingame, make any necessary final adjustments
-
Generate LODs. Character assets use 4 LODs - set 'Silhouette' to 'Highest' for each LOD and apply changes.
-
Note that LODs need to be regenerated every time the model is changed.
-