A small Blutility script exists here:
/Content/Dev/IconCreation/IconCreationBlutility
designed to help render icons of static meshes. A 4 minute video below illustrates how I use it. You can read more about the
HighResShot tool here
. The video is shot in the map
Content/Maps/photoshoot_map
This tutorial only covers the Rendering part of the process. An artist will then need to run Photoshop Macros on the output image to achieve the final production look for the image.
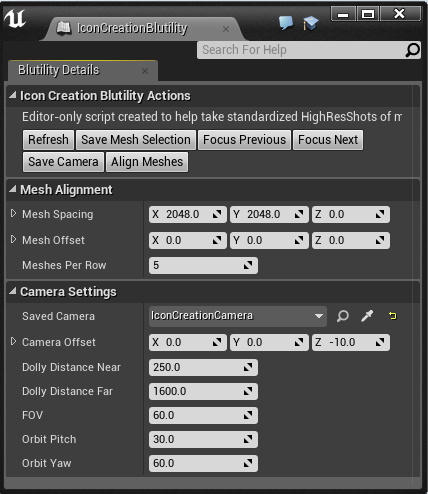
Upon double-clicking the Blutility asset, a window should pop up with the controls shown here.
The Buttons
Refresh : Update the viewport with current settings
Save Mesh Selection : Select a group of meshes and click this to remember and work on that selection
Save Camera : You must select the crosshair icon in the 3D view and click this button to remember the custom camera actor. Doing this will populate the Saved Camera below so that you know it worked.
Focus Previous / Next : Cycles to the previous or next mesh in the remembered mesh selection
Align Meshes : Will move the selection into a grid pattern defined in the Mesh Alignment settings
Mesh Alignment
This section lets you change what happens when you click ‘Align Meshes’. How far apart are the meshes, and do you want a manual offset? Also how many meshes on each row do you want?
Camera Settings
Saved Camera : Cannot be set using the Magnifying Glass or Eyedropper, unfortunately. You must select the Crosshair Icon in the 3D view and click ‘Save Camera’ to remember the camera actor. This is demonstrated in the video.
Camera Offset
: Nudges the camera target off the center of the object
Dolly Distance Near / Far
:
Tries to adjust how far away the camera is from small and large objects. If you find your meshes aren’t fitting the frame very well, try adjusting these and clicking Refresh.
FOV : Changes the Field of View of the camera
Orbit Pitch / Yaw : Lets you change the angle of the shot
Notes on Usage
Make sure you don’t manually edit the actual Camera Actor that is placed out. Doing so will skew the calculations. If you accidentally move the camera, just zero out all the Location and Rotation settings on it.
You can select all static meshes in the level by clicking one of them, and then hitting
Ctrl-Shift-A
. This selects all actors of the same class.
The video on this page shows how you can set up your workspace to have 2 views, a main 3D view, and also a view from the camera so that you can see what the screenshot will look like.
The Blutility script automatically sets and unsets the ‘Render Custom Depth’ flag on the selected mesh. But if meshes overlap when taking screenshots, you will have missing/clipped areas. Make sure objects are placed far enough apart.
You can look at the text in the Output log to see information about what the Blutility script is doing. For instance, every time you focus a new mesh, it will print the mesh’s name to the log. This could be used to create a script that renames the images you output to the screenshot folder. It will look something like this:
LogBlueprintUserMessages: [IconCreationCamera_481] Selected asset: SM_1h_acheron_sword_46
LogBlueprintUserMessages: [IconCreationCamera_481] Selected asset: SM_1h_axe_iron_58
LogBlueprintUserMessages: [IconCreationCamera_481] Selected asset: SM_1h_acheron_sword_46
LogBlueprintUserMessages: [IconCreationCamera_481] Selected asset: SM_1h_Ankh_48
LogBlueprintUserMessages: [IconCreationCamera_481] Selected asset: SM_1h_aquilonian_sword_50
LogBlueprintUserMessages: [IconCreationCamera_481] Selected asset: SM_1h_axe_Black_ice_52