Initial Set-Up
Under Content → Items → armor create a new folder with the name of the armor piece. Inside the folder create a Textures folder, a Meshes folder and a Material folder.
If the armor is for a DLC you first need to make or locate the DLC_[dlcName] → Items → Armor folder, then create the folders for your armor as normal, but make sure to name the folder DLC_[dlcName]_[armorset]
Mesh Import Settings
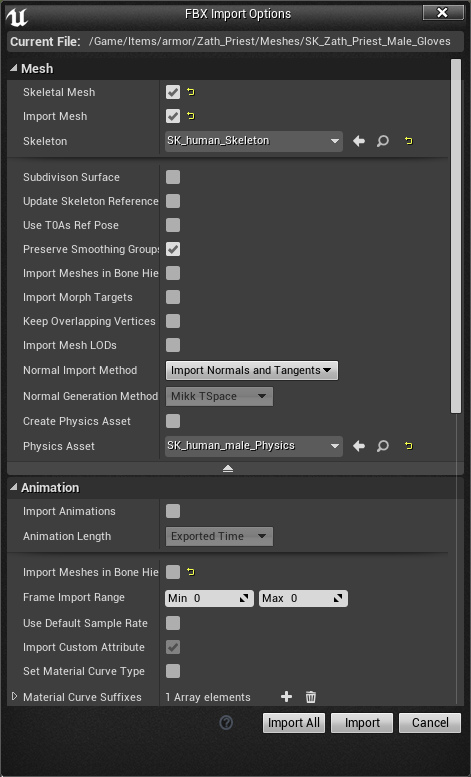
When importing the FBX Import Options will open. In this window you need to make sure that the following options are set.
-
Skeleton - SK_human_Skeleton
-
Import Meshes in Bone Hierarchy [ ]
-
Normal Import Method - Import Normals and Tangents
-
Physics Asset - SK_human_female_Physics or SK_human_male_Physics
-
Import Animations [ ]
-
Override Full Name [X]
-
Import Materials [ ]
-
Import Textures [ ]
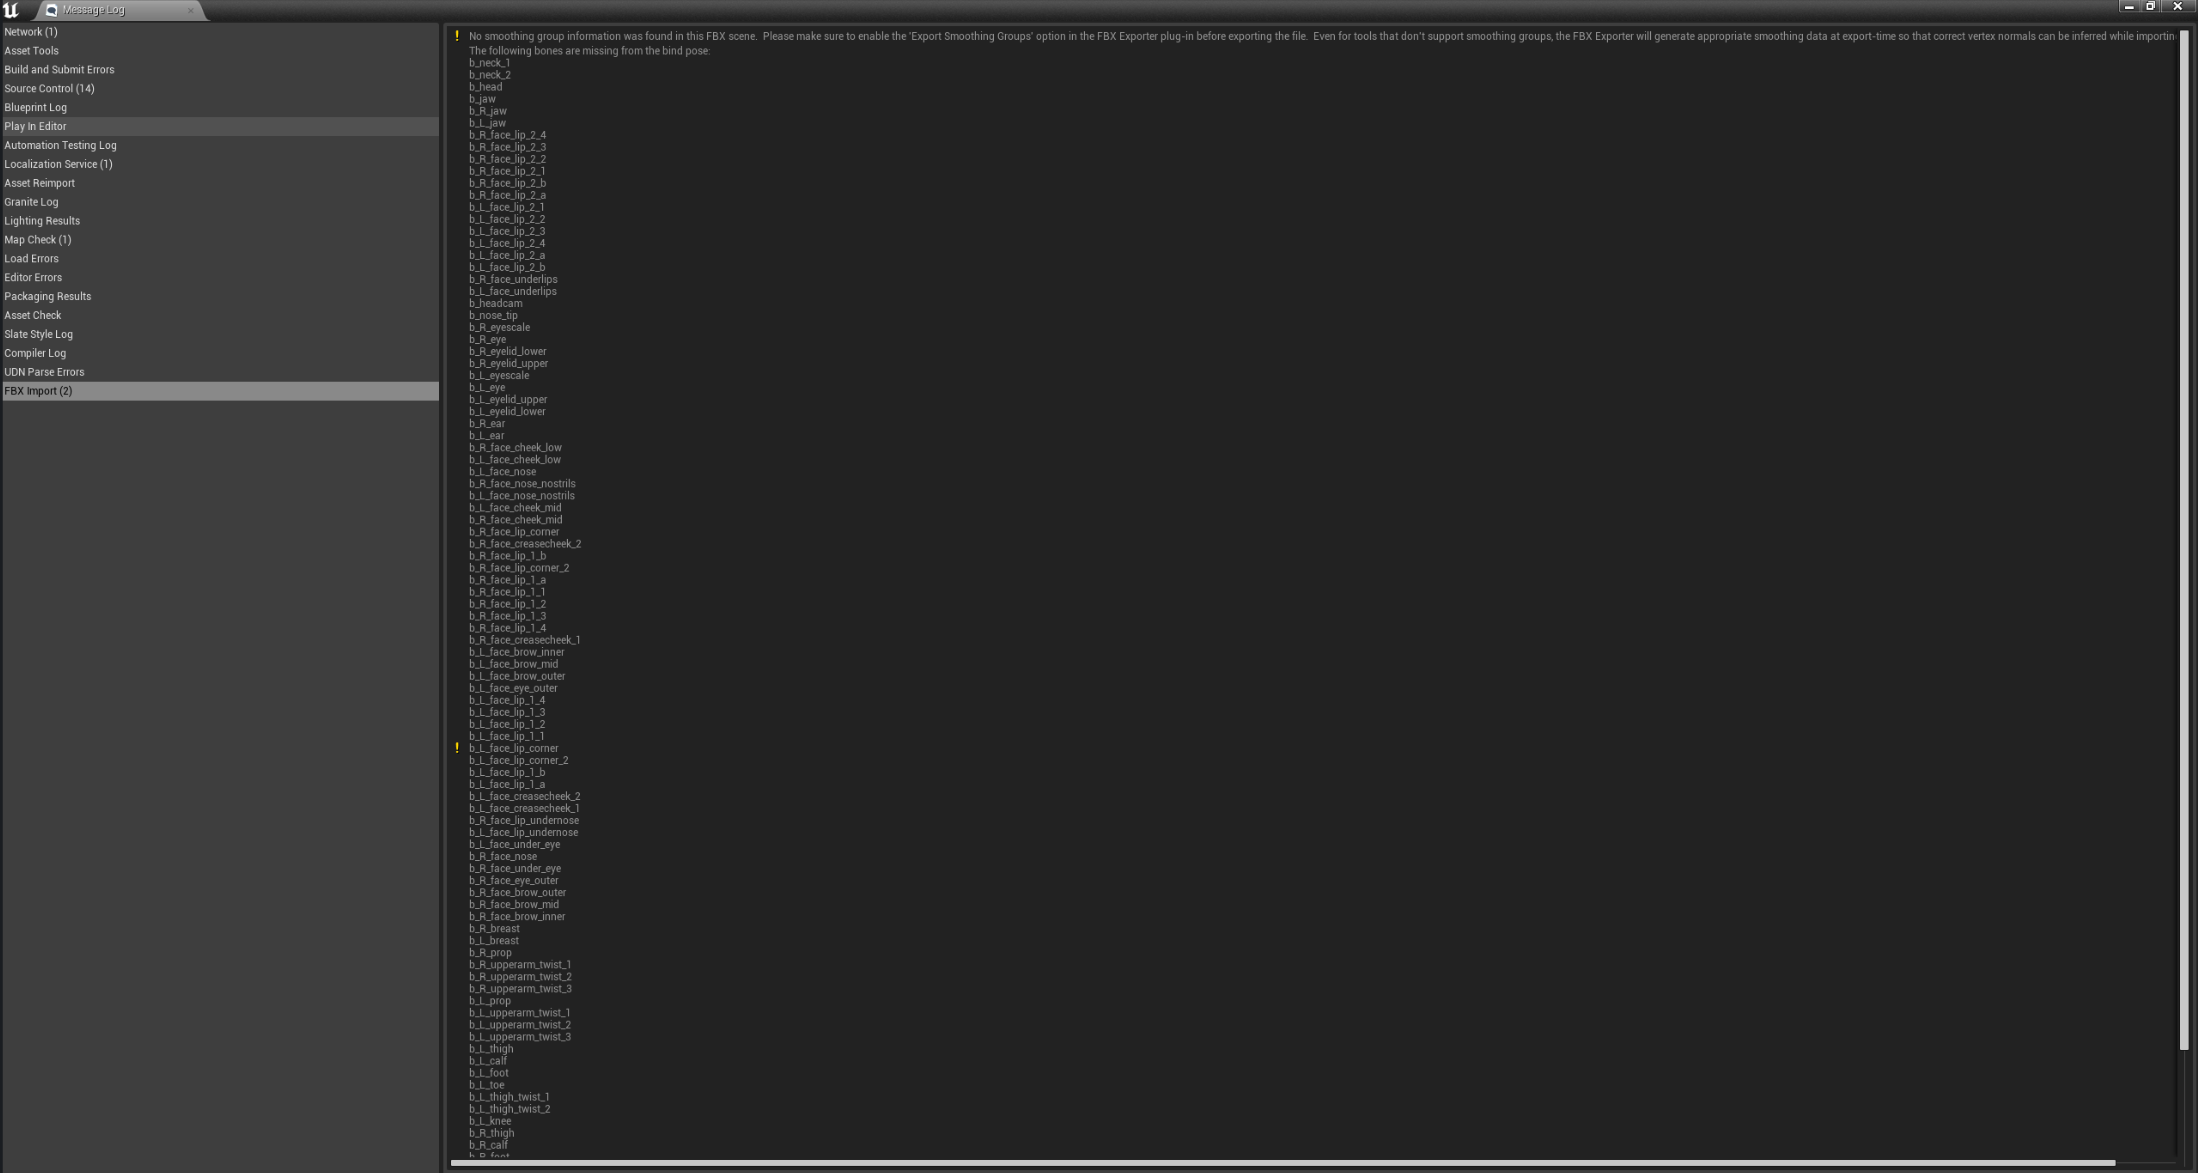
This Message Log will pop up (it only informs about the bones in the human skeleton that aren’t used by this particular model), but you can just close and ignore it.
Texture settings
Import textures for the asset. Shift + Select all the textures, right click and chose Asset Actions → Bulk Edit via Property Matrix…

-
Change Texture Group for _D, _M and _TM from World to Character
-
Change Texture Group for _N from WorldNormalMap to CharacterNormalMap
-
Tick OFF sRGB for _TM
Open texture and adjust the Maximum Texture Size slider. The texture size should always be assessed on an individual basis, and you should always check that the asset looks good when the material is assigned.
-
Rule of thumb is that textures for Top and Bottom should be set to 2048
-
Rule of thumb is that textures for Head, Hands and Feet should be set to 1024
Material Set Up
Material naming convention:
MI_A_[armorset]_[part]
Example:
-
MI_A_Zath_Priest_Head
-
MI_A_Stygian_Heavy_Boots
-
MI_A_Argos_Light_Top
Material instances for armor materials can be duplicated from existing armor materials, but should preferably be a direct material instance for the Armor base ver2. In Content → Items → Armor there is a material instance called MI_Armor_base_ver2 that can be duplicated, then move the duplicate to the Materials folder for your armor set.
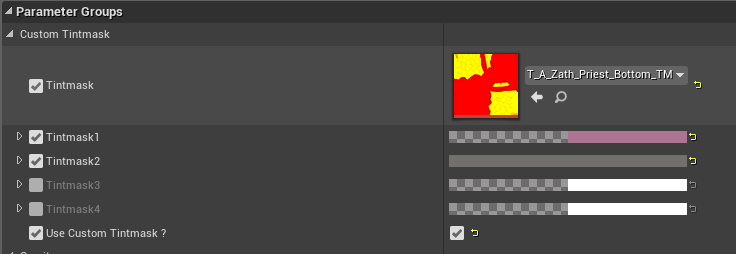
Once you have the new material in your folder, you can open the material and assign the armor set textures to the Tint Mask, Diffuse, Mask and Normal slots by dragging and dropping from your Textures folder, or searching for it in the slot roll down menu. Then tick on [X] Tintmask and both ticks on [X] Use Custom Tintmask? [x]. Also tick on the channels you are using, and use the respective colors pickers to find the colors you want for the armor. Most of the time it is easier to see how the armor will look if you assign the material to the mesh and have it open as reference as you are picking the colors.
-
Tintmask 1 = Red Channel
-
Tintmask 2 = Green Channel
-
Tintmask 3 = Blue Channel
-
Tintmask 4 = Alpha Channel
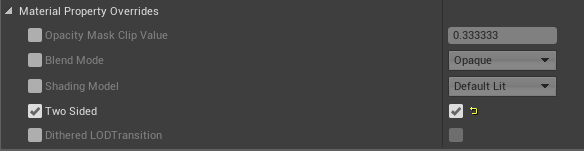
If any parts of your mesh is without thickness and should be viewed from both sides remember to tick on [X] Two Sided under General → Material Property Overrides.
!!! Always make sure that there are no warnings or error messages, as any problems with the material might cause it to break during Granite bake, even when it looks good in preview !!!

Creating LODs
After skinning is done and cloth physics is added LODs needs to be made. (Making LODs before skinning is done will cause LODs to lack proper skinning, and in worst case they will look completely broken.)
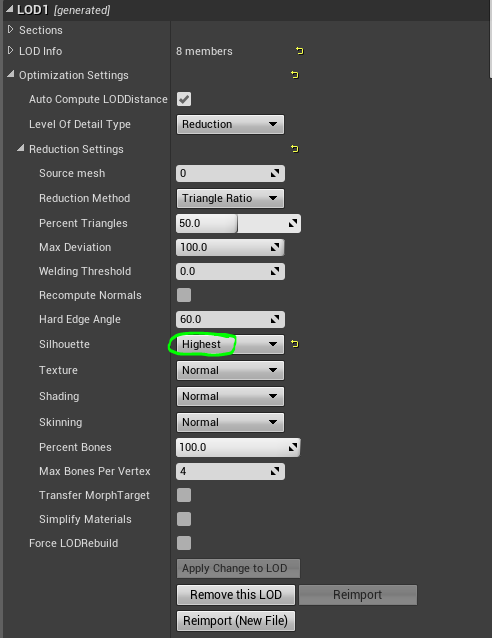
Open the mesh and locate LOD Settings → Number of LODs, slide it up to 4 and press Apply Changes. Under each LOD (LOD1, LOD2 and LOD3) go to Optimization Settings → Reduction Settings → Silhouette and set it to Highest, then press Apply Changes to LOD. This is to make sure the armor piece is easily distinguished by its shape, even at a distance.
Equipment Variation Table
The Equipment Variation Table is used to set up the armor assets so that they can be equipped in game. To set up an armor piece you need the item ID number (a 5-6 digit number that is individual for each asset), this should be in the task description, but if it is not you can ask the Art Producer, or the Designer responsible for the feature the armor piece belongs to.
Do not use ctrlZ to try to undo changes in the table. If you encounter problems with the data you’ve entered and get into a weird state, please revert the file and start again.
-
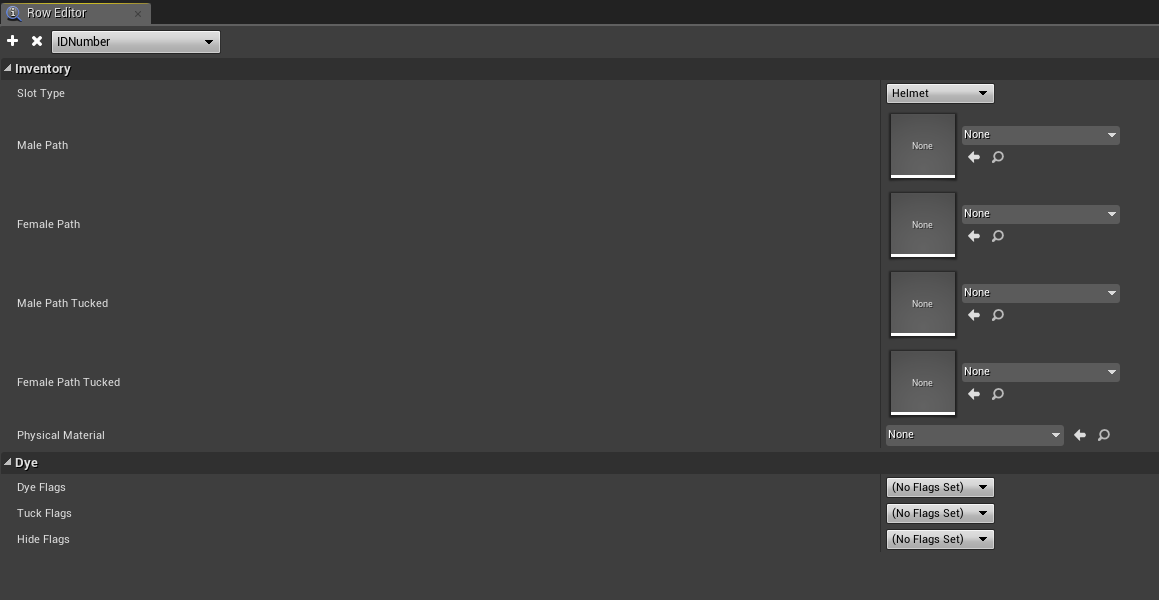
Open the Equipment Variation table and press the + sign on the left part of the screen in the Row Editor to add a new row.
-
Insert the ID number in the white box next to Row Name: and press enter.
-
Under Slot Type chose the type of Armor Piece you are adding, you should use the following:
-
Head = Helmets
-
Upperbody = Top pieces
-
Hands = Gloves
-
Lowerbody = Bottom pieces
-
Feet = Shoes/Boots
-
-
Drag and drop or search for the male version of the asset under Male Path, and female version under Female Path. If the asset has tucked versions these should be added to the Male Path Tucked and Female Path Tucked, if not these should be set to None.
-
Physical Material determines the sound of the asset. For most armors the Physical materials used are Armor_Light, Armor_Medium and Armor_Heavy, based on which tier of armor the asset is. In some special cases, like if the armor has a lot of free hanging bones, you should use Armor_Bones, or if it’s more of a decorative or casual outfit than an actual armor Armor_Light_less or Armor_Jewlery should be used.
-
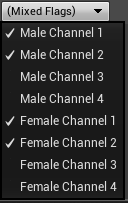
Dye → Dye Flags determines which dyeing channels the armor will use in game. Double check your material to see which Tintmask channels are used (Tintmask1 = Male Channel 1/Female Channel 1 and so on…) , and add them to Dye Flags. Remember to add both male and female.
-
Tuck Flags tells the asset which other assets it affects.
-
Gloves that extends up the forearm should tuck Upperbody
-
Boots that extends up the leg should tuck Lowerbody
-
-
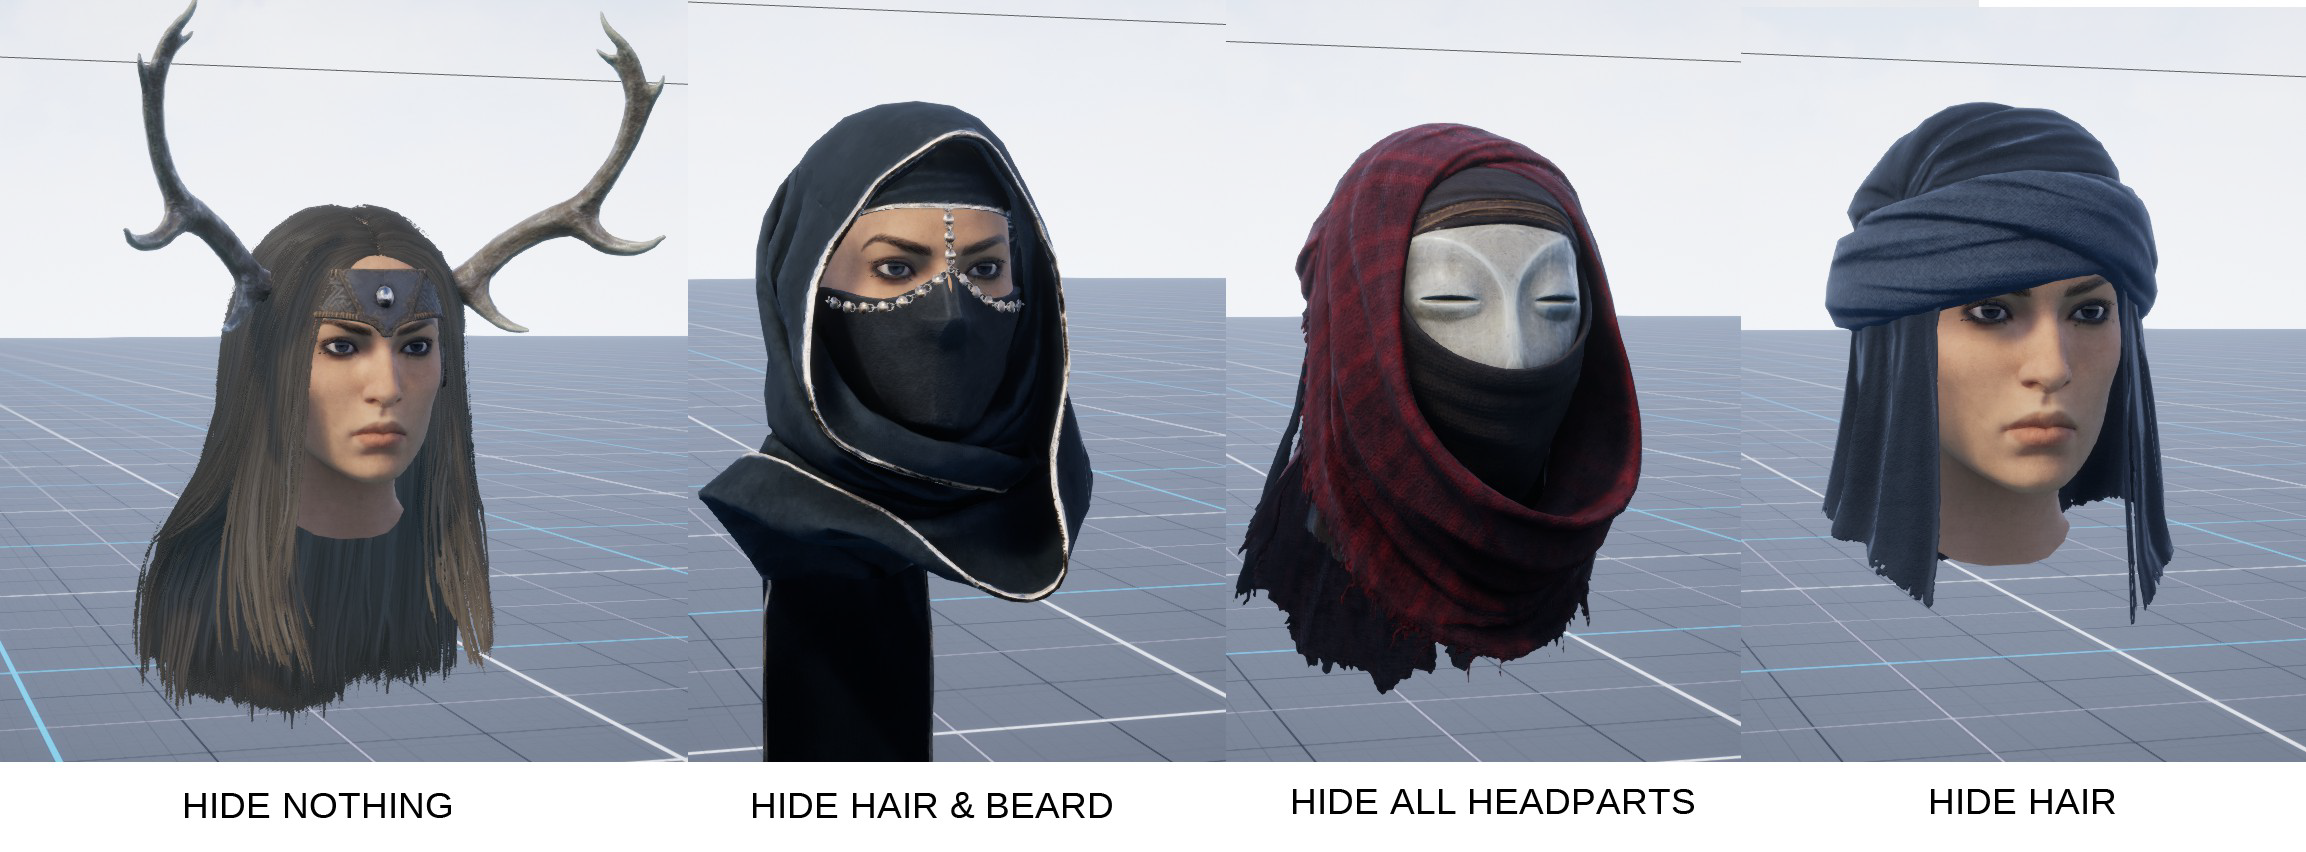
Hide flags tells the assets which parts of the body it covers.
-
Helmets may hide Hair, Facial Hair and Head, depending on the how much it covers.
-
Tops should hide forearms, if they have long sleeves
-
Gloves should hide forearms if they extend up the arm beyond the hand border.
-
Bottoms should hide legs if they extend down below the split between bottom and legs
-
Boots should hide legs if they extend up above the feet border.
-
-
A full guide to armor parts and cut off points can be found here: Armor Concept guidelines - Conan Exiles
Test! - Test! - Test!
When everything is set up, boot up the game map and equip your asset! Try to combine it with different armor and clothing pieces from other armor sets to make sure tucking and hiding works correctly, and run around in the world to look at it in different lighting and situations. Spawn in dyes and dye it in different colors to see how it looks.
Asset can be spawned in either by pressing shift + insert and locating it with its name in the gear tab in the top right corner (sometimes this doesn’t work as the asset might not be added to the gear tab yet, or it has changed name throughout production.) Or you can spawn it in by pressing insert and write in
spawnitem [ID_number] 1
Enjoy the glorious feeling of finishing up an asset! 🎉